Тусовщица
Содержание:
Мобы, добавленные в версии 1.2
|
ID |
Внешний вид |
Название |
Английское название |
|---|---|---|---|
| 146 | Взрывающийся снеговик | Exploding Snowman | |
| 147 | Ледяной слизень | Ice Slime | |
| 148 | Пингвин | Penguin | |
| 149 | Пингвин | Penguin | |
| 150 | Ледяная летучая мышь | Ice Bat | |
| 151 | Лавовая летучая мышь | Lava Bat | |
| 152 | Гигантская летучая лисица | Giant Flying Fox | |
| 153 | Гигантская черепаха | Giant Tortoise | |
| 154 | Ледяная черепаха | Ice Tortoise | |
| 155 | Волк | Wolf | |
| 156 | Красный дьявол | Red Devil | |
| 157 | Арапаима | Arapaima | |
| 158 | Вампир | Vampire | |
| 159 | Вампир | Vampire | |
| 160 | Трюфель | Truffle | |
| 161 | Зомби-эскимос | Zombie Eskimo | |
| 162 | Франкенштейн | Frankenstein | |
| 163 | Чёрная вдова | Black Recluse | |
| 164 | Паук | Wall Creeper | |
| 165 | Паук | Wall Creeper smth. | |
| 166 | Болотная тварь | Swamp Thing | |
| 167 | Скелет-викинг | Undead Viking | |
| 168 | Порченный пингвин | Corrupt Penguin | |
| 169 | Ледяной элементаль | Ice Elemental | |
| 170 | Свинья-дракон | Pigron | |
| 171 | Свинья-дракон | Pigron smth. | |
| 172 | Рунный маг | Rune Wizard | |
| 173 | Кримера | Crimera | |
| 174 | Чёртов ползун | Herpling | |
| 175 | Яростный охотник | Angry Trapper | |
| 176 | Замшелый шершень | Moss Hornet | |
| 177 | Чёртова блоха | Derpling | |
| 178 | Паромеханик | Steampunker | |
| 179 | Одержимый топор | Crimson Axe | |
| 180 | Свинья-дракон | Pigron | |
| 181 | Лицемонстр | Face Monster | |
| 182 | Летучий поганец | Floaty Gross | |
| 183 | Багровый слизень | Crimslime | |
| 184 | Шипастый ледяной слизень | Spiked Ice Slime | |
| 185 | Снежный флинкс | Snow Flinx | |
| 186 | Зомби | Zombie | |
| 187 | Зомби | Zombie | |
| 188 | Зомби | Zombie | |
| 189 | Зомби | Zombie | |
| 190 | Демонический глаз | Demon Eye | |
| 191 | Демонический глаз | Demon Eye | |
| 192 | Демонический глаз | Demon Eye | |
| 193 | Демонический глаз | Demon Eye | |
| 194 | Демонический глаз | Demon Eye | |
| 195 | Потерявшаяся девочка | Lost Girl | |
| 196 | Нимфа | Nymph | |
| 197 | Бронированный викинг | Armored Viking | |
| 198 | Ящер | Lihzahrd | |
| 199 | Ящер | Lihzahrd | |
| 200 | Зомби | Zombie | |
| 201 | Скелет | Skeleton | |
| 202 | Скелет | Skeleton | |
| 203 | Скелет | Skeleton | |
| 204 | Шипастый слизень джунглей | Spiked Jungle Slime | |
| 205 | Мотылёк | Moth | |
| 206 | Ледяной мерфолк | Icy Merman | |
| 207 | Продавец красителей | Dye Trader | |
| 208 | Тусовщица | Party Girl | |
| 209 | Киборг | Cyborg | |
| 210 | Пчела | Bee | |
| 211 | Пчела | Bee | |
| 212 | Матрос | Pirate Deckhand | |
| 213 | Корсар | Pirate Corsair | |
| 214 | Одноглазый пират | Pirate Deadeye | |
| 215 | Арбалетчик | Pirate Crossbower | |
| 216 | Капитан пиратов | Pirate Captain | |
| 217 | Кошенильный жук | Cochineal Beetle | |
| 218 | Тёмно-голубой жук | Cyan Beetle | |
| 219 | Лаковый жук | Lac Beetle | |
| 220 | Морская улитка | Sea Snail | |
| 221 | Кальмар | Squid | |
| 222 | Королева пчёл | Queen Bee | |
| 223 | Зомби в дождевике | Raincoat Zombie | |
| 224 | Летучая рыба | Flying Fish | |
| 225 | Слизень с зонтиком | Umbrella Slime | |
| 226 | Летающая змея | Flying Snake | |
| 227 | Маляр | Painter | |
| 228 | Знахарь | Witch Doctor | |
| 229 | Пират | Pirate | |
| 230 | Золотая рыбка | Goldfish | |
| 231 | Шершень | Hornet | |
| 232 | Шершень | Hornet | |
| 233 | Шершень | Hornet | |
| 234 | Шершень | Hornet | |
| 235 | Шершень | Hornet | |
| 236 | Паук джунглей | Jungle Creeper | |
| 237 | Паук джунглей | Jungle Creeper | |
| 238 | Чёрная вдова | Black Recluse | |
| 239 | Кровавый ползун | Blood Crawler | |
| 240 | Кровавый ползун | Blood Crawler smth. | |
| 241 | Кровосос | Blood Feeder | |
| 242 | Кровавая медуза | Blood Jelly | |
| 243 | Ледяной голем | Ice Golem | |
| 244 | Радужный слизень | Rainbow Slime | |
| 245 | Голем | Golem | |
| 246 | Голова голема | Golem Head | |
| 247 | Кулак голема | Golem Fist | |
| 248 | Кулак голема | Golem Fist | |
| 249 | Голова голема | Golem Head | |
| 250 | Грозная туча | Angry Nimbus | |
| 251 | Наблюдатель | Eyezor | |
| 252 | Попугай | Parrot | |
| 253 | Жнец | Reaper | |
| 254 | Грибной зомби | Spore Zombie | |
| 255 | Грибной зомби | Spore Zombie | |
| 256 | Грибная медуза | Fungo Fish | |
| 257 | Грибной рак-отшельник | Anomura Fungus | |
| 258 | Грибная коровка | Mushi Ladybug | |
| 259 | Гриб-бутон | Fungi Bulb | |
| 260 | Гигантский гриб-бутон | Giant Fungi Bulb | |
| 261 | Fungi Spore | ||
| 262 | Плантера | Plantera | |
| 263 | Plantera’s Hook | ||
| 264 | Plantera’s Tentacle | ||
| 265 | Spore | ||
| 266 | Мозг Ктулху | Brain of Cthulhu | |
| 267 | Creeper | ||
| 268 | Распылитель ихора | Ichor Sticker | |
| 269 | Ржавый бронированный скелет | Rusty Armored Bones | |
| 270 | Ржавый бронированный скелет | Rusty Armored Bones | |
| 271 | Ржавый бронированный скелет | Rusty Armored Bones | |
| 272 | Ржавый бронированный скелет | Rusty Armored Bones | |
| 273 | Синие бронированные кости | Blue Armored Bones | |
| 274 | Синие бронированные кости | Blue Armored Bones | |
| 275 | Синие бронированные кости | Blue Armored Bones | |
| 276 | Синие бронированные кости | Blue Armored Bones | |
| 277 | Адские бронированные кости | Hell Armored Bones | |
| 278 | Адские бронированные кости | Hell Armored Bones | |
| 279 | Адские бронированные кости | Hell Armored Bones | |
| 280 | Адские бронированные кости | Hell Armored Bones | |
| 281 | Потрёпанный колдун | Ragged Caster | |
| 282 | Потрёпанный колдун | Ragged Caster | |
| 283 | Некромант | Necromancer | |
| 284 | Некромант | Necromancer | |
| 285 | Сатанист | Diabolist | |
| 286 | Сатанист | Diabolist | |
| 287 | Бон Ли | Bone Lee | |
| 288 | Дух данжа | Dungeon Spirit | |
| 289 | Гигантский проклятый череп | Giant Cursed Skull | |
| 290 | Паладин | Paladin | |
| 291 | Скелет-снайпер | Skeleton Sniper | |
| 292 | Тактический скелет | Tactical Skeleton | |
| 293 | Скелет-диверсант | Skeleton Commando | |
| 294 | Разгневанный скелет | Angry Bones | |
| 295 | Разгневанный скелет | Angry Bones | |
| 296 | Разгневанный скелет | Angry Bones |
№7 Стена плоти – последний бой перед сложным режимом

Этот босс появляется в преисподней. После победы над ним мир игрока переходит в сложный режим с усиленными врагами, новыми биомами, в том числе, постоянно расширяющимся Освящением.
Если Королева пчел уже была побеждена, то сражение со Стеной Плоти проблем не вызовет. Пчелонаты лишат это «создание» глаз, а на поле боя появятся Пиявки, преследующие героя. Нужно создать длинную платформы и подготовить достаточно количество гранат, чтобы суметь закидать ими врага. Вызывать босса может Демон Вуду, несущий куклу-вуду над лавой, либо целенаправленный бросок этого предмета, добытого после убийства Демона.
Вступайте в бой со Стеной Плоти только в том случае, когда готовы к сложному режиму, поскольку вернуться назад будет нельзя.
Прохождение боссов сложного режима в Terraria 1.4
После победы над Стеной Плоти игроку предстоит продолжить свой путь в сложном режиме. Здесь битвы станут еще ожесточеннее, а боссы – искуснее. Подготовиться к сражениям можно, собрав разные ценности:
- можно отправиться пофармить Подражателей в Освящении;
- приобрести Лиственные крылья у Шамана в Джунглях;
- начать уничтожать Алтари, чтобы в мире появлялась редкая руда и т.д.
Только при развитии достаточного уровня силы можно отправлять к первому и последующим боссам Террарии в сложном режиме.
Pre-mechanical bosses[]
At this point in time, it becomes almost mandatory to pick a specific class. Many accessories will only benefit a certain class, and armor sets start to benefit only certain types of damage. However, summoner hybridization remains not only viable, but extremely potent due to the availability of the powerful Sanguine Staff.
At this point, you may also want to start working on getting good modifiers for your equipment.
Pre-Mech Bosses
Melee
Weapons
- Gradient
- Amarok
- Chain Guillotines
- Hel-Fire
- Dao of Pow
- Adamantite Sword
- Titanium Sword
- Bladetongue
- Ice Sickle
- Bananarang
- Fetid Baghnakhs
- Shadowflame Knife
- Sergeant United Shield
- Drippler Crippler
- Flying Knife
Armor
- Palladium armor
- Mythril armor
- Adamantite armor
- Titanium armor
- Frost Armor
Accessories
- Warrior Emblem
- Yoyo BagBerserker’s Glove
- Magma Stone
Buffs/Potions/Flasks
- Flask of Ichor
- Flask of Cursed Flames
- Sharpening Station
- Ale
- Sake
Pre-Mech Bosses
Ranged
Weapons
- Adamantite Repeater
- Titanium Repeater
- Shadowflame Bow
- Marrow
- Daedalus Stormbow
- Clockwork Assault Rifle
- Onyx Blaster
- Uzi
- Dart Rifle
- Star Cannon
- Dart Pistol
- Toxikarp
Armor
- Palladium armor
- Adamantite armor
- Titanium armor
- Frost Armor
Accessories
- Ranger Emblem
- Magic Quiver
Molten QuiverStalker’s Quiver
Buffs/Potions
- Archery Potion
- Ammo Reservation Potion
- Ammo Box
Ammunition
- Crystal Bullet
- Ichor Bullet
- Exploding Bullet
- Endless Musket Pouch
- Frostburn Arrow
- Jester’s Arrow
- Hellfire Arrow
- Holy Arrow
- Ichor Arrow
- Cursed Arrow
- Endless Quiver
- Ichor Dart
- Fallen Star
- Cursed Dart
- Crystal Dart
Pre-Mech Bosses
Magic
Weapons
- Meteor Staff
- Crystal Serpent
- Golden Shower
- Cursed Flames
- Crystal Storm
- Shadowflame Hex Doll
- Sky Fracture
- Spirit Flame
- Life Drain
- Clinger Staff
- Nimbus Rod
Armor
- Palladium armor
- Adamantite armor
- Titanium armor
- Forbidden armor
- Mystic Robe
Accessories
- Celestial Cuffs
- Sorcerer Emblem
- Magnet Flower
Buffs/Potions
- Mana Regeneration Potion
- Magic Power Potion
- Crystal Ball
Pre-Mech Bosses
Summoning
Weapons
- Blade Staff
- Spider Staff
- Queen Spider Staff
- Sanguine Staff
- Firecracker
- Cool Whip
- Pirate Staff
Armor
- Spider armor
- Forbidden armor
- Obsidian armor ()
Accessory
- Summoner Emblem
- Berserker’s Glove
- Pygmy Necklace ()
Mounts
- Pirate Ship
- Goat
- Unicorn
- Basilisk
- Winged Slime
Buffs/Potions
- Flask of Ichor
- Flask of Cursed Flames
- Summoning Potion
- Bewitching Table
Pre-Mech Bosses
Mixed
Armor
- Crystal Assassin armor
- Spider Greaves
Accessories
- Lightning Boots
- Terraspark Boots
- Amphibian Boots
- Obsidian Shield
- Ankh Shield
- Charm of Myths
- Frozen Wings
- Leaf Wings
- Putrid Scent
- Flesh Knuckles
Mounts
- Pirate Ship
- Goat
- Pigron
- Unicorn
- Basilisk
- Winged Slime
Buffs/Potions
- Regeneration Potion
- Ironskin Potion
- Swiftness Potion
- Rage Potion
- Wrath Potion
- Heartreach Potion
- Lifeforce Potion
- Endurance Potion
- Well Fed
- Plenty Satisfied
- Exquisitely Stuffed
- Slice of Cake
№5 Скелетрон – вход в темницу

Игроки часто спорят о том, какого босса бить после прохождения Глаза Ктулху и испытаний собственного ужасного биома. Мы считаем, что целесообразнее отправиться в Темницу к Скелетрону, а только после этого в Джунгли. Дроп из первого места может быть очень полезен при исследовании второго.
Войдя в Подземелье своего мира, вы столкнетесь со Стариком. Именно разговор с этим NPC провоцирует появление Скелетрона. Летающий босс-скелет смотрится ужасающе, но на самом деле легко побеждается при условии правильной застройки арены. Эффективными против Скелетрона будут персонажи в Багровой броне и с дальнобойным оружием, а также маги.
Потратьте время на возведение арены для сражения со Скелетроном. Этот босс имеет высокую скорость и большой запас здоровья. Если не успеть убить его до восхода солнца, то все придется начинать сначала следующей ночью. После победы над ним можно будет попасть в Темницу, где хранятся различные ценности, в частности, меч Мурамаса, магическое оружие Водяная стрела и Теневые ключи.
Небесные башни
Небесные башни (Celestial Towers) — серия из четырёх боссов, добавленная в обновлении 1.3. Каждая из этих башен создаёт возле себя уникальный биом с сильными, и нигде больше не встречающимися существами. Все четыре башни появляются в мире после победы над культистом-лунатиком. На данный момент является наиболее сложным событием в игре.
Каждая из башен окутана непробиваемым щитом, снять который может только убийство 100 существ (150 в эксперт моде), призываемых башней. Все без исключения существа не имеют какой-либо добычи, чем меньше существ осталось убить, тем щит прозрачней. После убийства большого количества мобов щит пропадает, но существа продолжают появляться. Игроку остается только добить башню, у которой 20000 единиц здоровья. После уничтожения башни мобы перестают появляться.
Касание башен не наносит урона, но некоторые башни имеют оборонительные способности.
Каждая башня дропает от 12 до 60 фрагментов (18-90 в режиме эксперта). Каждой башне соответствует свой тип фрагментов. С их помощью на древнем манипуляторе можно сделать оружие, броню или артефакты (для некоторых предметов могут потребоваться еще и люминитовые слитки).
Уничтожение башен производит эффект, подобный уничтожению теневой сферы или живого сердца. Спустя 1 минуту после уничтожения всех башен, к персонажу прибывает лунный лорд.
Монстры
| Башня | Прислужники | ||
|---|---|---|---|
| Башня солнца | Селениан | Драканиан | Дракомайр |
| Корит | Сроллер | ||
| Ползоножка | |||
| Башня вихря | Личинка чужого | Шершень чужих | Матка чужих |
| Вортексианец | Штормопроходец | ||
| Башня туманности | Летун туманности | Высасыватель мозга | |
| Предсказатель | Эволюционировавший зверь | ||
| Башня звёздной пыли | Звёздная клетка | Захватчик потока | |
| Звездочёт | Мерцающий ловец | ||
| Млечный ткач |
Громадное дерево
Громадное дерево (Giant Tree) — натуральная структура, добавленная в версии 1.2. Встречается в лесу, но генерируется там с маленьким шансом. Само дерево состоит из живой древесины, лиан и блоков кроны. Под этим деревом может появиться тоннель, ведущий вниз (но не всегда). Иногда рядом с тоннелем можно обнаружить комнату со стульями и столом из живой древесины. Также в этой комнате можно заметить сундук из живой древесины, в котором лежат довольно полезные для новичков вещи, среди них есть пара предметов с интересными возможностями — к примеру, жезл листвы и ветвь живого дерева. С небольшим шансом может заспауниться без комнат.
Цитаты тусовщицы
«Вау, (имя игрока), при виде такого отважного человека, как ты, я хочу тусить!» («Wow, (имя игрока), meeting an adventurous man like you makes me want to party!»)
«Мы должны сделать вечеринку с мерцающими корнями, а потом еще афтепати!» («We should set up a blinkroot party, and we should also set up an after-party.»)
«Когда-то я была в Швеции, они тусовались на всю катушку, почему ты не такой-же?» («I went to Sweden once, they party hard, why aren’t you like that?»)
«Я не могу решить, что мне нравится больше: вечеринки, или вечеринки после вечеринок!» («I can’t decide what I like more: parties, or after-parties.»)
«Мы должны поговорить. Это… Это о вечеринках.» («We have to talk
It’s… it’s about parties.»)
«Доставай диско-шар и я покажу тебе, как тусовать!» («Put up a disco ball and then I’ll show you how to party.»)
«Ты тусуешься? Хотя бы иногда? Хм, ладно, тогда мы можем поговорить.» («Do you party? Sometimes? Hm, okay then we can talk…»)
«Моё имя (имя тусовщицы), но люди меня зовут «организатором» вечеринок. Да-уж, я не знаю, но это звучит круто.» («My name’s (имя тусовщицы) but people call me party pooper. Yeah, i dont know, it sounds cool though.»)
«Я думаю, что мне пора причесаться!» («I think it is about time i got my hair did!»)
Во время вечеринки:
- «Хмм? Ничего необычного сегодня… шучу! Это вечеринка, а потом будет афтепати!» («Hmm? Nothing special today… just kidding! It’s party time, and then it’s after party time!»)
- «Наконец-то, моё время пришло!» («At last, my time has come!»)
Other[]
Some equipment sets are not meant for fighting, but for other activities, such as fishing, building and exploring. All equipment is optional and makes it easier to perform the task, but otherwise simply use what is at hand.
Wiring
The Mechanic NPC unlocks wiring, selling the basic tools.
Tools
- The Grand Design
- Wire and other wiring items
Accessories
- Toolbelt
- Toolbox
- Architect Gizmo Pack
- Mechanical Ruler
Summoner gear might prove useful to defend against enemies while engineering.
Building
Tools
- Spectre Paintbrush
- Spectre Paint Roller
- Spectre Paint Scraper
- The Grand Design
- Bottomless Water Bucket
- Bottomless Lava Bucket
- Super Absorbant Sponge
- Lava Absorbant Sponge
- Ice Rod
- Cosmic Car Key or similar mounts
Accessories
- Toolbelt
- Toolbox
- Architect Gizmo Pack
- Mechanical Ruler
- Ancient Chisel
Potion
Hooks
Summoner gear is useful for defending against enemies while building.
Fishing
Tools
- Hotline Fishing Hook
- Golden Fishing Rod
- Chum Bucket
Armor
Accessories
- High Test Fishing Line
- Angler Earring
- Tackle Box
- Lavaproof Fishing Hook
- Angler Tackle Bag
- Lavaproof Tackle Bag
- Fish Finder
- Shield of Cthulhu
Potions
- Crate Potion
- Fishing Potion
- Sonar Potion
Bait
- Journeyman Bait
- Master Bait
- Magma Snail
- Hell Butterfly
- Enchanted Nightcrawler
Summoner gear might prove useful to defend against enemies while fishing. A Shield of Cthulhu can be used without interrupting fishing. If you found Lavaproof Fishing Hook, you don’t need to use Hotline Fishing Hook anymore.
Catching
Tools
- Bug Net
- Lavaproof Bug Net
- Golden Bug Net
Accessory
- Lifeform Analyzer
- Guide To CritterCompanionship
Buffs/Potions
- Battle Potion
- Water Candles
Exploring/Mining
Ракеты[]
Ракеты используются для стрельбы из ракетного оружия.
Это содержимое включено со страницы .На данный момент в Terraria существует 12 / 4 различных видов ракет, все из которых можно получить только в сложном режиме.
| Название | Урон | Доступность | Редкость | Источник | Стандартный радиус взрыва | Разрушает тайлы |
|---|---|---|---|---|---|---|
| Ракета IВнутренний ID предмета: 771 | 40 /35 | Всегда | Покупается у киборга (50) | Малый | ✗ | |
| Ракета IIВнутренний ID предмета: 772 | 40 | Во время кровавой луны | Покупается у киборга (250) | Малый | ✓ | |
| Ракета IIIВнутренний ID предмета: 773 | 65 /55 | Ночью иливо время солнечного затмения | Покупается у киборга (1) | Большой | ✗ | |
| Ракета IVВнутренний ID предмета: 774 | 65 /69 | Во время солнечного затмения | Покупается у киборга (5) | Большой | ✓ | |
| Кластерная ракета IВнутренний ID предмета: 4445 | 50 | После марсианского безумия | Покупается у киборга (750) | Обширный | ✗ | |
| Кластерная ракета IIВнутренний ID предмета: 4446 | 50 | После марсианского безумия,во время кровавой луны или солнечного затмения | Покупается у киборга (15) | Обширный | ✓ | |
| Высушивающая ракетаВнутренний ID предмета: 4459 | 40 | Всегда | Покупается у киборга (50) | Крошечный | ✓ (только вода) | |
| Водяная ракетаВнутренний ID предмета: 4447 | 40 | Всегда | → ( / ) | Крошечный | ✗ | |
| Лавовая ракетаВнутренний ID предмета: 4448 | 40 | Всегда | → ( ) | Крошечный | ✗ | |
| Медовая ракетаВнутренний ID предмета: 4449 | 40 | Всегда | → ( ) | Крошечный | ✗ | |
| Мини-ядерный заряд IВнутренний ID предмета: 4457 | 75 | Всегда | 100 + → ( ) | Огромный | ✗ | |
| Мини-ядерный заряд IIВнутренний ID предмета: 4458 | 75 | Всегда | 100 + → ( ) | Огромный | ✓ |
Как заполучить нипа
В Террарии жители могут встречаться и в ходе путешествия по карте, и возникать при определенных условиях. Также можно предложить им поселиться у себя в доме. Для этого необходимо соблюсти также определенные условия. Для каждого нипа они свои. Однако почти всегда необходимо построить отдельную комнату для своего персонажа. Ведь ему нужно где-то жить… Если же персонаж не поселяется даже после того, как были исполнены все требования, то следует прежде всего проверить, не «протекает» где-либо карта. В большинстве случаев, это проявляется в том, что выстроен «дырявый» дом или карта, а также проблема может быть связана с неоднородностью стен. Также необходимо проверить, закрыта ли в жилище дверь.
Иногда помогает и следующий трюк. Нужно убрать из комнаты всю мебель, переставив ее куда-нибудь в другое место. А затем уйти на некоторое время в совершенно другое окружение. Как правило, после этого персонаж поселяется в предложенном ему доме. Зная, как заселить жителей в Terraria, можно превратить карту в густонаселенный район, без особенных проблем закупать необходимое снаряжение и успешно отражать атаки монстров. Так как Террария – это РПГ с открытым миром, то она просто обязана быть заселена всевозможными живыми существами. И действительно в игре Террария персонажи представлены довольно широко. Причем, каждый из них обладает своими уникальными особенностями и может оказать игроку действительно реальную помощь во время прохождения игры.
Item drops[]
For a list of all dropped items, see Drops.
Some items are dropped by all enemies (except enemies spawned by statues, Old One’s Army enemies, Lunar Events enemies, and Meteor Heads) under certain conditions. Those can be found below.
| Item | Condition | Amount | Chance |
|---|---|---|---|
| Soul of Light | During Hardmode in the Underground Hallow. | 1 |
|
| Soul of Night | During Hardmode in the Underground Corruption/Crimson. | 1 |
|
| Jungle Key | During Hardmode in the Jungle and Underground Jungle. | 1 |
|
| Corruption Key | During Hardmode in the Corruption and Underground Corruption. | 1 |
|
| Crimson Key | During Hardmode in the Crimson and Underground Crimson. | 1 |
|
| Hallowed Key | During Hardmode in the Hallow and Underground Hallow. | 1 |
|
| Frozen Key | During Hardmode in the Snow and Ice biomes. | 1 |
|
| Desert Key | During Hardmode in the Desert and Underground Desert. | 1 |
|
| Jungle Key Mold | During Hardmode in the Jungle and Underground Jungle. | 1 |
|
| Corruption Key Mold | During Hardmode in the Corruption and Underground Corruption. | 1 |
|
| Crimson Key Mold | During Hardmode in the Crimson and Underground Crimson. | 1 |
|
| Hallowed Key Mold | During Hardmode in the Hallow and Underground Hallow. | 1 |
|
| Frozen Key Mold | During Hardmode in the Snow and Ice biomes. | 1 |
|
| Pirate Map | During Hardmode in an Ocean biome. | 1 |
|
| Living Fire Block | During Hardmode in The Underworld. | 20-50 |
|
| Mechanical Eye | During Hardmode, before defeating The Twins. | 1 |
|
| Mechanical Worm | During Hardmode, before defeating The Destroyer. | 1 |
|
| Mechanical Skull | During Hardmode, before defeating Skeletron Prime. | 1 |
|
| KO Cannon | During a Blood Moon in Hardmode. | 1 |
|
| Present | During Christmas. | 1 |
|
| Goodie Bag | During Halloween. | 1 |
|
| Bloody Machete | During Halloween, from enemies with <20 defense, <40 damage and <5 loot. | 1 |
|
| Bladed Glove | During Halloween, from enemies with <20 defense, <40 damage and <5 loot. | 1 |
|
| Cascade | Before Hardmode, after defeating Skeletron, in the Underworld. | 1 |
|
| Amarok | During Hardmode in the Snow biome. | 1 |
|
| Yelets | After defeating any mechanical boss, in the Jungle. | 1 |
|
| Kraken | From any enemy inside the Hardmode Dungeon. | 1 |
|
| Hel-Fire | During Hardmode in the bottom half of the Cavern layer or the Underworld. | 1 |
|
| Star | When player is below maximum mana. | 1-2 |
|
| Heart | When player is below maximum health. | 1 |
|
Spawn locations[]
Each player in the game will spawn their own enemies. If two players are in the same area, monsters will appear twice as fast as they would with only one player. Max Spawns rule are still used, which means that even if 2 players are in the same spot, you cannot gather 30 normal monsters near the spot. (Don’t forget, the bats count as 1/2, and some special enemies count as 2 or more.)
Choosing a spot to spawn the enemy
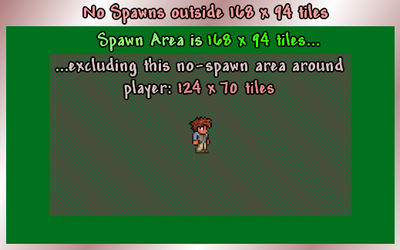
Spawn area illustration (status 2014)
Verify When the game decides to spawn an enemy, it will first choose a random tile within a rectangle around the player (specifically, the tile containing the top left corner of the player’s hitbox). The maximum distance from the player it can choose from is 84 tiles east, 83 west, 46 up, and 45 down. If the picked tile is a solid block, it will try another one. Tiles that are actuated out do not count as solid. If the picked tile has a player-placed wall that blocks enemies from spawning, it will also try another tile.
Once an empty tile is found, it moves down until it finds the ground. (Note that this tile can be more than 45 tiles below from the player. If it finally is outside the «Active Rectangle» it will be instantly despawned, anyway.) If there is enough space for an enemy to be spawned at this location, this will be the tile it chooses. The exception to this is when the player is in an area where Harpies and many other flying enemies can be spawned. In this case, the game does not attempt to find a ground tile.
The chosen tile is then checked to make sure it is not within the «safe» area around the player. It cannot be within 62 tiles east or west, or 34 tiles up or down. Also, the chosen tile space must be completely outside 2088 × 1172 pixel rectangles centered on the center of each player’s hitbox. (If the player is not riding a mount, the top edge of this is 34 + 3/16 tiles above the top left corner tile mentioned above, meaning that NPCs can spawn on ground exactly 35 tiles above a player standing on half blocks, but not a player standing on full blocks.)
Using certain items causes monsters to spawn further out than normal. Equipping a Rifle Scope or Sniper Scope does so only when the player has a compatible gun selected, whether or not the player is zoomed out.
| Items | Spawn range | Safe range | ||
|---|---|---|---|---|
| Horizontal | Vertical | Horizontal | Vertical | |
| Normal | 84 | 46 | 62 | 34 |
| Rifle Scope (or derivatives) | 114 | 62 | 92 | 50 |
| Binoculars | 124 | 68 | 102 | 56 |
| Sniper Rifle | 124 | 68 | 102 | 56 |
| Sniper Rifle with Rifle Scope (or derivatives) | 132 | 72 | 110 | 60 |
Note : If using the Depth Meter, Compass, or similar, each tile is equal to 2 feet, so double all measurements to get distances in feet
On the Mobile version, the no-spawn area around the player is 68 by 48 tiles, and the spawn area is 112 by 62 tiles. In addition, enemies cannot spawn closer than 34 tiles to the sides and 24 tiles up and down. They also cannot spawn farther than 56 tiles to the sides and 31 tiles up and down.
Choosing a type of enemy to spawn
The type of enemy spawned will depend on many factors including, but not limited to:
- Time of day
- Weather (e.g., Angry Nimbus and Ice Golem require Rain/Blizzard)
- Depth
- Relative X location on the map (Ocean)
- Current biome (Corruption, Meteor, Jungle, etc…)
- Ground tile type
- Wall behind player (e.g. Dungeon Brick Wall, Lihzahrd Brick Wall)
- Special events (Blood Moon, Solar Eclipse, invasion events, etc)
- Randomness
References[]
- A tick is a time unit countable by the software. Most of Terraria‘s updating logic happens every tick. A tick has the length of 1/60th of a second, hence there are 60 ticks in a second and 3600 ticks in a minute.
- Information taken from the Desktop 1.4.2.3 source code, function in There may be inaccuracies, as the current Desktop version is 1.4.3.2.
- Information taken from the Desktop 1.4.2.3 source code, field in . There may be inaccuracies, as the current Desktop version is 1.4.3.2.
- Information taken from the Desktop 1.4.2.3 source code, field in . There may be inaccuracies, as the current Desktop version is 1.4.3.2.
- ↑ Blood Moons only affect the spawn rates above the surface.
- ↑ Weather additionally affects spawn rates and max spawns in the Snow biome.
- ↑ Only applied if the Meteorite biome does not overlap with the Dungeon, the Underground Desert, the Desert during a Sandstorm, the Jungle, or the evil biomes. If it does overlap with any of those biomes, then the overlapping biome’s spawn rate and max spawns are used.
- If artificially created.
- ↑ The product of the denominators is rounded down to the nearest integer.
- More precisely, above an altitude of 65% between the surface line and the top of the world, i.e. the same area where Space-exclusive enemies spawn in pre-Hardmode. See .
Game mechanics
Combat
- Attack speed
- Autoswing
- Critical hit
- Damage
- Knockback
- Lock on
- Minions
- Velocity
Environment
- Ambient objects
- Ambient entities
- Biome backgrounds
- Biomes (Spread)
- Day and night cycle
- Events
- Gravity
- Hardmode
- Liquids
- Moon
- Music
- NPC despawning
- NPC spawning
- Pre-Hardmode
- Secret seeds
- Status messages
- Wind
- World
- World Seed
- World size
Interface
- Minimap
- Logo
- Title messages
- Tips
- Resource Packs
Items
- Alternative crafting ingredients
- Block Swap
- Consumables
- Crafting stations (By Hand)
- Crossover content
- Explosion-proof objects
- Flat surface items
- Mining speed
- Modifiers
- NPC drops
- Placement
- Pickaxe power
- Rarity
- Recipes
- Storage
- Tooltips
- Use time
- Value
Game
- Achievements
- AI
- Camera Mode
- Config.json
- Cursor modes
- Data IDs
- Difficulty
- Emote Commands
- Expert Mode
- Fishing
- Game controls
- Game platform
- Golf
- Hoik
- Journey Mode
- Lighting mode
- Master Mode
- Music
- NPC names
- Parallax
- Pylons
- Settings
- Town
Multiplayer
- Server
- Chat
- Multiplayer
Player
- Aggro
- Breath meter
- Buffs and debuffs
- Character
- Character styles
- Damage reduction
- Death
- Defense
- Drowning
- Extra jump
- Fall damage
- Ghost
- Hairstyles
- Health
- Health regeneration
- Inventory
- Luck
- Mana
- Movement speed
- Player stats
- Social slots
- Spawn
Мебель
Рабочие места
| Верстак | Стол и стул | Алхимический столик | Алхимическая лаборатория |
| Железная наковальня | Свинцовая наковальня | Мифриловая наковальня | Орихалковая наковальня |
| Печь | Адская печь | Адамантитовая печь | Титановая печь |
| Ткацкий станок | Лесопилка | Котёл | Котелок |
| Костёр | Пивной бочонок | Авто-молот | Древний манипулятор |
| Мастерская инженера | Книжный шкаф | Чан для красителей | Массивный верстак |
| Кристальный шар | Наполнитель | Демонический алтарь | Кровавый алтарь |
| Мясорубка | Смешиватель | Отвердитель | Стеклоплавильная печь |
| Станция клонирования плоти | Печь ящеров | Небесная фабрика | Дозатор мёда |
| Генератор льда | Паровой котёл | Станок из живой древесины | Костяной сварщик |
| Перерабатыватель |
Источники света
| Факел | Проклятый факел | Светящаяся палочка | Клейкая светящаяся палочка |
| Свеча | Канделябр | Люстра | Лампа |
| Фонарь | Фонарный столб | Китайский фонарь | Фонарь-череп |
Прочая мебель
| Дверь | Стол | Стул | Кровать | Диван |
| Комод | Пианино | Дедушкины часы | Ванна | Трон |
| Скамья | Туалет | Книга | подставка | Стойка для оружия |
| Сундук | Сундук-ловушка | Мусорное ведро | Сейф | Статуя |
| Глиняный горшок | Свинья-копилка | Знак | Картина | Знамя |
| Кристальный шар | Манекен | Пузырный механизм | Лампа пустынного духа | Карта сокровищ |
| Роза ветров | Кашпо с водорослями | Бочонок | Штурвал | Спасательный круг |
| Настенный якорь | Корабль в бутылке | Коробка с фейерверками | Фонтан фейерверков |
Вечеринка
- Шарик-животное (Balloon Animal)
- Глуповатый шарик (Silly Pink/Purple/Green Balloon)
- Связка глуповатых шариков (Silly Tied Bundle of Balloons)
- Машина глуповатых шариков (Silly Balloon Machine)
- Центр вечеринки (Party Center)
- Свиньята (Pigronata)
- Праздничная лента (Blue/Green/Pink Streamer)
- Праздничный подарок (Party Present)
- Связка праздничных шаров (Bundled Party Balloons)
Basic constraints[]
The exact rules are listed on , but the issues can be summarized (all of these factors combine):
- NPCs get a 12% or 6% bonus for being in a loved or liked biome, or a penalty for being in a hated or disliked one.
- They get a similar bonus or penalty for being housed near another NPC they love, like, dislike, or hate.
- They get an «overcrowding» penalty for having more than two «nearby» NPC, no matter the relationship. The penalty is 5% for each additional «nearby» NPC, i.e., for the third, the fourth, etc. «nearby» NPC.
- Conversely, they get a 5% «solitude» bonus for not having more than two NPCs nearby, and having no more than three other
Note that this much larger range may sometimes represent over a full screen’s width.
NPCs (that is, the two «roommates» do not count) within 120 tiles.
The above factors affect a variety of transactions with NPCs:
- Vendor prices for selling their items will be lower if they are happy, higher if they are unhappy.
- Conversely, vendor prices for buying the player’s items will be higher if they are happy, lower if they are unhappy.
- This does affect the Nurse’s fees for healing and the Goblin Tinkerer’s reforging costs.
- This also affects the Angler’s quest rewards – if happy or unhappy, he will give rewards as if the player had completed more or fewer quests, respectively.
- This even affects the Tax Collector’s revenue stream – if happy, he will not only collect more money in a given time, but gather a higher maximum amount, and the reverse if he is unhappy.
And two other factors come into play, but for these happiness is irrelevant – all that matters is the NPC’s presence:
- NPCs also suppress enemy spawning nearby. In Normal mode, 3 NPCs «on screen» are needed to completely suppress the spawning of enemies, which is usually desirable for a town.
- To remain functional, a pylon needs to have two NPCs housed within 169×124-tile rectangle centered on the pylon.
Depending on game progress, there are also up to three town pets available. These count as NPCs for pylons and enemy suppression, but not for crowding/solitude calculations; while it is sometimes claimed that they can affect the happiness of nearby NPCs, this is not the case either positively or negatively, rendering them useful primarily for keeping a town eligible for pylons and enemy suppression when other NPCs are not available (for instance, keeping a dog and cat in the same duplex as the Nurse and Arms Dealer would prevent you from accidentally disabling their pylon if you often relocate the two of them for boss fights), or for extending a town’s enemy suppression zone further without crowding its inhabitants.