Обзор final fantasy xiv от новичка: как начать играть в ff14 и стоит ли?
Содержание:
- Другие навыки
- Level 71 — 80
- Bosses
- Миссии гранд-компаний
- Официальные и неофициальные ограничения пробной версии Final Fantasy 14
- First One-Time Grind
- Level 21 — 30
- # 2 — Белый маг
- Equipment[]
- Profile[]
- Вакансии Shadowbringers
- Behind the scenes[]
- Ultimate raids[]
- Starting Attributes
- Задания Stormblood
- Lost Fragments
- Loot
- №1 — Астролог
- Level 11 — 20
Другие навыки
У вас есть очень полезные другие навыки, от мгновенной атаки до исцеления и воскрешения, вот список:
- Флеш: Атака с силой 440. Используется повторно через 25 секунд.
- Contre Sixte: наносит атаку с силой 400 по цели и всем противникам поблизости. Перепрошить через 35с.
- Vercure: Восстанавливает HP цели. Сила лечения 350. Время произнесения: 2с.
- Verraise: воскрешает цель до ослабленного состояния. Время произнесения 10сек.
- Ускорение: гарантирует, что следующие три каста Verthunder / Verflare или Veraero / Verholy при первых попаданиях будут вызывать Verfire Ready или Verstone Ready соответственно на 20 секунд. Отлита в 55-е годы.
- Смелость: увеличивает собственный магический урон на 10% и физический урон ближайших членов группы на 10%. Оба эффекта снижаются на 20% каждые 4 секунды в течение 20 секунд. Переделать через 120-е годы.
- Манафикация: удвоение текущих уровней черной и белой маны. Также сбрасывает таймеры изменения корпуса, перемещения и взаимодействия. Дарует усиление магического урона на 5% на 10 секунд. Все комбо отменяются после выполнения Manafication.
Вы можете использовать Dualcast для мгновенного рейза, насколько это круто? Ver означает универсальность, не так ли? Затем у нас есть ролевые действия для бойцов дальнего боя.
Level 71 — 80
| Item | Icon | Level | Item Level | Damage | Delay | Auto Attack | Materia Slots | Stats and Attributes |
|---|---|---|---|---|---|---|---|---|
| Lakeland Lance | 71 | 390 | 107 | 2.80 | 99.86 | 2 | Strength +381, Vitality +426, Determination +337, Skill Speed +236 | |
| Applewood Spear | 72 | 395 | 96 | 2.80 | 89.60 | 2 | Strength +351, Vitality +395, Critical Hit +216, Determination +309 | |
| Fae Spear | 73 | 400 | 108 | 2.80 | 100.80 | 2 | Strength +399, Vitality +451, Determination +245, Skill Speed +350 | |
| Bluespirit Spear | 74 | 403 | 97 | 2.80 | 90.53 | 2 | Strength +362, Vitality +408, Determination +318, Direct Hit Rate +223 | |
| Ravel Keeper’s Spear | 75 | 406 | 110 | 2.80 | 102.66 | 2 | Strength +405, Vitality +455, Critical Hit +360, Skill Speed +252 | |
| Sandteak Fauchard | 76 | 409 | 99 | 2.80 | 92.40 | 2 | Strength +368, Vitality +410, Critical Hit +333, Determination +233 | |
| Nabaath Spear | 77 | 412 | 111 | 2.80 | 103.60 | 2 | Strength +413, Vitality +456, Critical Hit +266, Direct Hit Rate +379 | |
| Dwarven Lignum Lance | 78 | 415 | 100 | 2.80 | 93.33 | 2 | Strength +375, Vitality +411, Determination +245, Direct Hit Rate +350 | |
| Trident of the Forgiven | 79 | 418 | 112 | 2.80 | 104.53 | 2 | Strength +421, Vitality +457, Critical Hit +399, Direct Hit Rate +280 | |
| Dreizack Replica | 80 | 1 | 6 | 2.80 | 5.60 | |||
| Replica Augmented Law’s Order Spear | 80 | 1 | 6 | 2.80 | 5.60 | |||
| Replica Dreizack Recollection | 80 | 1 | 6 | 2.80 | 5.60 | |||
| Replica Law’s Order Spear | 80 | 1 | 6 | 2.80 | 5.60 | |||
| Augmented Menis | 80 | 430 | 103 | 2.80 | 96.13 | 2 | Strength +393, Vitality +413, Critical Hit +260, Direct Hit Rate +372 | |
| Weathered Trishula | 80 | 430 | 114 | 2.80 | 106.40 | 2 | Strength +437, Vitality +459, Critical Hit +413, Determination +289 | |
| Ronkan Partisan | 80 | 440 | 115 | 2.80 | 107.33 | 2 | Strength +451, Vitality +462, Determination +294, Direct Hit Rate +420 | |
| Skystrider | 80 | 450 | 105 | 2.80 | 98.00 | 2 | Strength +428, Vitality +445, Determination +391, Direct Hit Rate +273 | |
| The King’s Spear | 80 | 450 | 117 | 2.80 | 109.20 | 2 | Strength +476, Vitality +494, Critical Hit +304, Direct Hit Rate +434 | |
| Augmented Skystrider | 80 | 460 | 107 | 2.80 | 99.86 | 2 | Strength +452, Vitality +476, Determination +403, Direct Hit Rate +282 | |
| Deepshadow Lance | 80 | 460 | 119 | 2.80 | 111.06 | 2 | Strength +502, Vitality +529, Critical Hit +448, Determination +314 | |
| Menis | 80 | 465 | 120 | 2.80 | 112.00 | 2 | Strength +516, Vitality +548, Critical Hit +319, Direct Hit Rate +455 | |
| Augmented Deepshadow Lance | 80 | 470 | 121 | 2.80 | 112.93 | 2 | Strength +530, Vitality +566, Critical Hit +462, Determination +323 | |
| Edengrace Spear | 80 | 475 | 122 | 2.80 | 113.86 | 2 | Strength +544, Vitality +585, Critical Hit +327, Direct Hit Rate +467 | |
| Ultimate Rhongomiant | 80 | 475 | 122 | 2.80 | 113.86 | 3 | Strength +544, Vitality +585, Critical Hit +327, Direct Hit Rate +467 | |
| Neo-Ishgardian Trident | 80 | 480 | 111 | 2.80 | 103.60 | 2 | Strength +502, Vitality +543, Critical Hit +425, Direct Hit Rate +297 | |
| Dreizack | 80 | 485 | 124 | 2.80 | 115.73 | 5 | Strength +573, Vitality +623, Critical Hit +477, Determination +334 | |
| Ruby Partisan | 80 | 485 | 124 | 2.80 | 115.73 | 2 | Strength +573, Vitality +623, Critical Hit +334, Direct Hit Rate +477 | |
| Augmented Neo-Ishgardian Trident | 80 | 490 | 112 | 2.80 | 104.53 | 2 | Strength +528, Vitality +579, Critical Hit +434, Direct Hit Rate +303 | |
| Crystarium Spear | 80 | 490 | 125 | 2.80 | 116.66 | 2 | Strength +587, Vitality +643, Determination +337, Direct Hit Rate +482 | |
| Spear of Light | 80 | 495 | 126 | 2.80 | 117.60 | 2 | Strength +602, Vitality +664, Critical Hit +487, Determination +341 | |
| Augmented Crystarium Spear | 80 | 500 | 127 | 2.80 | 118.53 | 2 | Strength +617, Vitality +685, Determination +344, Direct Hit Rate +492 | |
| Augmented Dreizack | 80 | 500 | 127 | 2.80 | 118.53 | 5 | Strength +617, Vitality +685, Critical Hit +492, Determination +344 | |
| Dreizack Recollection | 80 | 500 | 127 | 2.80 | 118.53 | 5 | Strength +617, Vitality +685, Critical Hit +492, Determination +344 | |
| Edenchoir Fork | 80 | 505 | 128 | 2.80 | 119.46 | 2 | Strength +634, Vitality +707, Critical Hit +498, Direct Hit Rate +349 | |
| Exarchic Spear | 80 | 510 | 116 | 2.80 | 108.26 | 2 | Strength +586, Vitality +657, Determination +318, Direct Hit Rate +454 | |
| Law’s Order Spear | 80 | 510 | 129 | 2.80 | 120.40 | 5 | Strength +651, Vitality +730, Critical Hit +353, Determination +504 | |
| Augmented Law’s Order Spear | 80 | 515 | 130 | 2.80 | 121.33 | Strength +668, Vitality +754 | ||
| Emerald Partisan | 80 | 515 | 130 | 2.80 | 121.33 | 2 | Strength +668, Vitality +754, Critical Hit +510, Direct Hit Rate +357 | |
| Augmented Exarchic Spear | 80 | 520 | 118 | 2.80 | 110.13 | 2 | Strength +617, Vitality +700, Determination +325, Direct Hit Rate +464 | |
| Cryptlurker’s Spear | 80 | 520 | 131 | 2.80 | 122.26 | 2 | Strength +686, Vitality +778, Determination +361, Direct Hit Rate +515 | |
| Diamond Zeta Partisan | 80 | 525 | 132 | 2.80 | 123.20 | 2 | Strength +704, Vitality +804, Critical Hit +365, Determination +521 | |
| Augmented Cryptlurker’s Spear | 80 | 530 | 133 | 2.80 | 124.13 | 2 | Strength +723, Vitality +830, Determination +368, Direct Hit Rate +526 | |
| Edenmorn Halberd | 80 | 535 | 134 | 2.80 | 125.06 | 2 | Strength +725, Vitality +836, Critical Hit +531, Direct Hit Rate +372 |
Bosses
https://youtube.com/watch?v=li-gw7A6bxw%3F
The Aery Guide
https://youtube.com/watch?v=hBL0pxFLLPo%3F
Updated Shadowbringers Guide
https://youtube.com/watch?v=N-SEAnxifiQ%3F
The Aery Guide
Rangda
Rangda is a lightning-themed boss with a few straight-forward mechanics.
- Electric Cachexis is a long-cast attack that will attack everyone outside of Rangda’s melee range. (Similar to Dragon’s Voice from Cutter’s Cry).
- When Rangda places the Prey debuff on you, run to one of the tall pillars encircling the room to transfer it.
- Kill adds as they spawn.
Gyascutus
Gyascutus is a poison-themed boss.
- Gyascutus will place clouds of poison around the room. For each cloud out, Gyascutus will gain a stacking damage buff.
- At intervals, bombs will spawn. Allow these to eat one or two of the gas clouds to manage how many buffs the boss has before killing them. (If not killed before consuming 4 clouds, a bomb will start casting self destruct that will hit the entire room, dealing damage and applying 4 poison stacks to each party member.)
Nidhogg
- The Crimson Price will put out increasing numbers of fiery orbs (starting with 2, with one more each time the attack is repeated) that do burning damage for a short period of time, then fire off a line AoE. When the final boss faces you while casting this attack, simply take a few steps to one side.
- The Sable Price will trap one player, causing them to float as it casts Sable Weave. If Sable Weave is allowed to complete, the trapped player will die.
- At about 30% health, the final boss will retreat to prepare an instant-death attack. During this time, multiple waves of adds will spawn and try to attack your NPC ally. It is important that tanks pull aggro of adds and face them away from the NPC so they do not die. Healers can keep the NPC alive by healing it. Kill adds as quickly as you can. When the final add dies, your NPC ally will put up a protective shield you must get under to avoid the instant-death attack. If your NPC dies or the adds do not die quickly enough, you will wipe.
- No new mechanics after this point, simply a repeat of the Crimson Price and Sable price attacks until the boss is dead.
- It should be noted that if the NPC dies at any point in the fight, including after he shields the instant death attack, Nidhogg will fire another, which is a guaranteed wipe.
Миссии гранд-компаний
Присоединившись к гранд-компании, вы разблокируете различные миссии, за которые полагается награда. Помимо опыта, за миссии и фракционные квесты выдается валюта Grand Company seals. Она используется в основном для приобретения предметов у квартирмейстра (Company Quartermaster). Найти его можно в зале штаба (Company Hall).
Миссии по снабжению
После разговора с офицером по персоналу вашей фракции вы можете выполнять миссии по снабжению (для Disciples of the Hand и Land). За сдачу определенных предметов игрок получает много опыта и валюту Grand Company seals. Награда удваивается, если принесенный предмет имеет высокое качество или отмечен звездочкой. Каждый день доступна только одна миссия по снабжению для каждого из классов, но так как она обновляется ежедневно, ее можно использовать как неплохой источник опыта.
Стоит сказать о том, что количество получаемого опыта и качество других наград за миссии по снабжению фиксируются на момент сдачи квеста. То есть, если вы достигли 30 уровня и выполнили миссию, но в течение дня взяли, к примеру, 50 уровень, то на следующий день вы все равно получите награды, соответствующие 30 уровню. Награду, соответствующую вашему текущему уровню, вы получите только на следующий день.
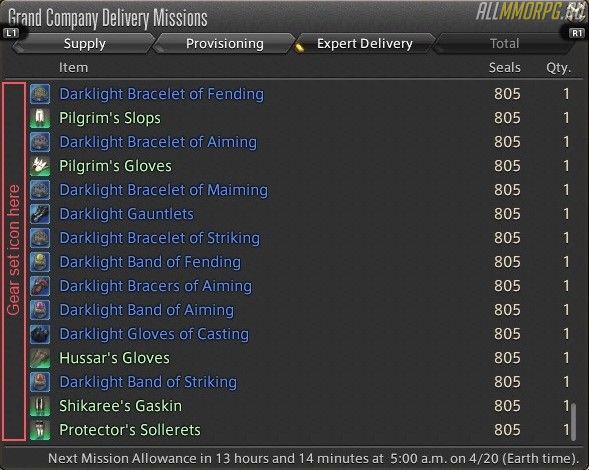
Продвинутые миссии по снабжению
После получения ранга «Сержант второго класса» (Sergeant Second Class) вам станут доступны продвинутые миссии по доставке (Expert Delivery Missions). Сдав представителю своей фракции редкое снаряжение, вы получите валюту Grand Company seals. В число требуемых предметов входит все, что вы найдете в подземельях, рейдах или испытаниях. Также необходимые для сдачи предметы можно купить у торговца камнями.
Ливквесты гранд-компании (Levequests)
Ливквесты гранд-компании – это особые задания, доступные только для членов определенной фракции. Их суть сводится к тому, чтобы вы завершили какую-либо задачу в окрестностях. За выполнение ливквестов вы получите очки опыта и Grand Company seals.
Журнал охоты гранд-компании (Hunting Log)
Журнал охоты гранд-компании похож на классовый журнал охоты, за исключением награды. За выполнение миссий из Hunting Log вашей фракции вы получите только Grand Company seals. Монстры, которых нужно убить по заданию журнала охоты, встречаются только в подземельях. Новые типы миссий в журнале охоты фракции появляются по мере того, как вы повышаете свой ранг в гранд-компании.
Официальные и неофициальные ограничения пробной версии Final Fantasy 14
Даже если вы играете в бесплатную пробную версию Final Fantasy 14, готовьтесь к тому, что вам придется потратить кучу времени, чтобы познакомиться со всем доступным контентом. Однако не забывайте, что практически везде есть некоторые ограничения. Ниже мы подробно расскажем о том, что конкретно нельзя делать в пробной версии игры. Все ограничения поделены на две категории – официальные, опубликованные на сайте Square Enix, и неофициальные, которые были выявлены игроками во время игры в бесплатную FFXIV.
Официальные ограничения пробной версии FFXIV
Разработчики проекта открыто говорят о том, что игроки, не купившие полную версию игры:
- Могут создавать только 1 персонажа в одном игровом мире (в общей сложности не более 8 персонажей в разных игровых мирах на одном аккаунте);
- Не могут открыть какой-либо класс или профессию выше 60 уровня;
- Не могут носить с собой более 300 тыс. гил (одной суммой);
- Не имеют доступа к таким функциям внутриигрового чата как «Кричать» (Shout) и «Говорить» (Tell);
- Не могут использовать внутриигровой рынок (Market board);
- Не могут обмениваться и торговать предметами с другими игроками;
- Не могут отсылать письма другим игрокам;
- Не могут нанимать слуг;
- Не могут создавать каналы Linkshell и Cross-World Linkshell, но могут присоединиться к уже существующим;
- Не могут создавать гильдии (Free Company) или вступать в них;
- Не могут приглашать игроков в свою группу, но могут присоединиться к другой группе по приглашению;
- Не могут создавать PvP команды или присоединяться к ним. Также бесплатным учетным записям недоступно участие в рейтинговых и командных рейтинговых PvP сражениях;
- Не могут посещать официальный форум Lodestone и пользоваться приложением Companion.
Неофициальные ограничения пробной версии FFXIV
В списке ниже перечислены все ограничения бесплатной версии игры, которые не указаны на официальном сайте Square Enix, но были выявлены игроками:
- Если на вход в выбранный вами мир есть очередь, то приоритет имеют игроки, которые оплатили FFXIV и имеют «полную» учетную запись. Те, кто играет бесплатно, будут ждать дольше, прежде чем попадут в игру;
- Если вы когда-либо покупали Final Fantasy 14, но потом перестали играть, то вы не сможете пользоваться возможностями пробной учетной записи. Это ограничение действует, даже если вы никогда не проходили контент, который сейчас доступен в бесплатной версии.
First One-Time Grind
Before you can unlock the ability to augment your Law’s Order weapon, you will need to complete the one-time Side Quest The Resistance Remembers, which requires you to collect and turn in 18 Haunting Memories of the Dying and 18 Vexatious Memories of the Dying. This grind only needs to be done once, and does not need to be repeated for additional weapons.
- 3 Haunting Memories of the Dying drop from Shadow of Mhach (Heavensward) alliance raids and a chance* to drop 1 from FATEs in the Gyr Abania region.
- 3 Vexatious Memories of the Dying drop from Return to Ivalice (Stormblood) alliance raids and a chance* to drop 1 from FATEs in the Far East region (Othard).
(*) chances have been increased in patch 5.45
Level 21 — 30
| Item | Icon | Level | Item Level | Damage | Delay | Auto Attack | Materia Slots | Stats and Attributes |
|---|---|---|---|---|---|---|---|---|
| Elm Velocity Bow | 21 | 21 | 14 | 2.80 | 13.06 | 2 | Dexterity +4, Vitality +3, Critical Hit +4 | |
| Flame Private’s Shortbow | 22 | 23 | 16 | 2.80 | 14.93 | Dexterity +4, Vitality +5, Direct Hit Rate +5 | ||
| Serpent Private’s Shortbow | 22 | 23 | 16 | 2.80 | 14.93 | Dexterity +4, Vitality +5, Direct Hit Rate +5 | ||
| Storm Private’s Shortbow | 22 | 23 | 16 | 2.80 | 14.93 | Dexterity +4, Vitality +5, Direct Hit Rate +5 | ||
| Aetherial Wrapped Elm Longbow | 24 | 24 | 16 | 3.36 | 17.92 | Dexterity +5, Vitality +5 | ||
| Wrapped Elm Longbow | 24 | 24 | 14 | 3.36 | 15.68 | 2 | Dexterity +4, Vitality +4, Critical Hit +4 | |
| Bow of Owls | 24 | 26 | 17 | 2.80 | 15.86 | Dexterity +5, Vitality +5, Determination +4, Skill Speed +5 | ||
| Aetherial Ash Composite Bow | 28 | 28 | 18 | 3.20 | 19.20 | Dexterity +6, Vitality +6 | ||
| Ash Composite Bow | 28 | 28 | 16 | 3.20 | 17.06 | 2 | Dexterity +5, Vitality +5, Determination +4 | |
| Joukil’s Guile | 28 | 30 | 19 | 3.20 | 20.26 | Dexterity +6, Vitality +7, Critical Hit +8, Determination +4 | ||
| Bow of the White Wisp | 30 | 30 | 19 | 3.04 | 19.25 | Dexterity +6, Vitality +7 | ||
| Flame Private’s Bow | 30 | 31 | 20 | 2.64 | 17.60 | Dexterity +7, Vitality +7, Direct Hit Rate +9 | ||
| Serpent Private’s Bow | 30 | 31 | 20 | 2.64 | 17.60 | Dexterity +7, Vitality +7, Direct Hit Rate +9 | ||
| Storm Private’s Bow | 30 | 31 | 20 | 2.64 | 17.60 | Dexterity +7, Vitality +7, Direct Hit Rate +9 |
# 2 — Белый маг
Классическая роль Final Fantasy с тростью, вооруженная тростью, прошла нелегкий путь к второму месту в списке. Хотя они всегда были жизнеспособными, в FF14 долгое время Белый Маг чувствовал себя немного потерянным. Теперь, в Shadowbringers, Белый Маг — король личного целителя DPS с интенсивным всплеском, который стыдит двух других, пока их регенерация тикает.
Прямо сейчас не имеет значения, что у White Mage нет реальной полезности в виде баффов, таких как карты Astrologian или Chain Strategem ученого, они наносят столько личного DPS, что компенсируют это. White Mage прост и не имеет дополнительных компонентов для интенсивного микроменеджмента, таких как фея или карты, но это тоже часть удовольствия от игры. Как Белый Маг, думайте о себе как о ДПС, который просто маскируется под целителя. Они — взрыв в подземельях, где их AOE-атака, Holy, оглушает и наносит массивные удары по здоровью врагов, которые уничтожат их до того, как у ваших реальных членов группы DPS появится шанс.
Белые маги полагаются на регенерацию и несколько мгновенных заклинаний, чтобы восстановить HP своей группе. Благословение, лучшее мгновенное исцеление одной цели в игре, может в одиночку спасти любого обреченного танка быстрее, чем Ученый или Астролог. Глупый Темный рыцарь вот-вот умрет из живых мертвецов? Просто примените Бене!
И снова, хотя все жизнеспособно, Белые Маги по-прежнему считаются одним из наиболее желанных из трех классов. С точки зрения баффов они мало способствуют, но хороший означает, что они накручивают личный DPS, который компенсирует это. Белых магов легче всего подобрать из трех с простыми способностями, простыми поворотами и минимальными дополнительными заботами. Если вы хотите прыгнуть во что-то, что вы можете быстро поднять и опустить, попробуйте White Mage.
Equipment[]
An hyuran warrior with the Bravura and Fighter’s artifact armor.
Marauders and warriors predominantly wield two-handed axes. Their armor is primarily made up of «Fending» gear that they share with other tanking disciplines, boasting the highest defenses among all armors. At lower levels they also have access to lighter armors used by DPS disciplines. While the these items’ bonus attributes may be of use, it is important to weigh their benefits against the defenses lost.
The primary attributes for Marauders and Warriors are and , which boost their and respectively, and should be prioritized over other attributes. As tanking disciplines, they have access to the tank-exclusive attribute, which boosts their damage done and healing received, while also lowering damage taken.
| Lists of marauder and warrior equipment | |
|---|---|
|
Head Body Hands Waist Legs Feet |
Earrings Necklaces Bracelets Rings |
Profile[]
The Viera is a leporine race of people commonly found in Southern Othard. While the majority of their population resides closed-off from the rest of Hydaelyn in the Golmore Jungle, in recent times more have decided to leave the safety of the forest to explore the world. As such, it is estimated that the Kingdom of Dalmasca is comprised of around 5% of Viera.
The Viera in Golmore Jungle live under a strict code, the «Green Word» (also known as the Word of the Wood), that forbid them from interacting with the outside world unless strictly necessary. Those who leave to discover the world are forever banished, never to return.
In the alternate world the First, the Viera are known as «Viis» and live in the Rak’tika Greatwood as caretakers for the ruins of lost empire of Ronka.
Male Viera will be available as a playable option in Final Fantasy XIV: Endwalker.
Physiology
It is estimated that around 80% of Viera are born female, with males and females being identical at birth until they leave adolescence and reach adulthood around the age of 13, which is when males become distinguishable from females.
Viera (and Viis) live for hundreds of years, easily longer than three lifetimes of an Elezen, who are known to live longer than many other races themselves. Viera retain their physical youth for centuries, making it nigh impossible to discern the age of a Viera from their outward appearance.
Even though male Viera are the main guardians of the jungle, the martial prowess of female Viera is not to be underestimated as they are just as formidable as the men, merely choosing to devote their attention to the protection of their hearth and young.
Culture
The word «Viera» itself means «people of the wood» and a Viera child is referred to as a «kit».
Like the Keepers of the Moon, Viera tribes are a matriarchal society that is ruled by, and mostly comprised of, women. Viera men are rare and remain deeply solitary, except when they return to their village of birth every three to five years to mate.
While the men are the primary defenders, Viera women still defend the forest but they also devote time to responsibilities such as clearing undergrowth, removing fallen trees, planting seeds and eradicating vermin among other tasks.
The Viera refer to aether as Mist, as demonstrated by Fran Eruyt at Orbonne Monastery.
The response the Wandering Dramaturge got after asking a Viera woman «if she did not find her tribe’s ways awkward. Was it not within the natural order for males and females of a species to coexist?» was:
- «The value of coexistence will not be found ‘neath a loincloth. Long has our kind endured understanding that the distance ‘twixt two bodies does not dictate the distance ‘twixt two souls.»
In the alternate world the First, the Viera are known as «Viis» and much of the culture from the Viera of the Source is retained in the Viis culture itself, from being a matriarchal society and excluding males from their villages to said villages being formed around massive trees, linked by suspended paths.
Wood-warders
Despite being excluded from villages, male Viera still play an important role in Viera society by taking on the mantle of Wood-warders, serving as protectors of the forest. The duty of a Wood-warder is to ensure that the domain of their tribe is untouched by the destructive whims of outsiders.
Male Viera return to their village every three to five years not only to mate but to claim any young males that have entered adulthood yet still live within the village, as their wards, to teach them how to survive in the wilderness on their own and without the crutch of companionship.
Only after many seasons of training and strict adherence to the Word of the Wood will the students earn the title of master and be allowed to seek solitude.
The training required to become a Wood-warder often leaves more than a few to perish during the brutal rite of passage, further thinning the number of males in the tribe.
It is standard that Wood-warders attack from the shadows, often shooting first and not even bothering with asking questions.
Вакансии Shadowbringers
Как и в случае с заданиями Stormblood, единственное требование для двух заданий Shadowbringers — это то, что вы достигли уровня 60 в другом задании и приобрели расширение Shadowbringers . Эти задания начинаются с 60-го уровня и идут с сундуком с соответствующим оборудованием.
Gunbreaker
- Роль: танк
- Оружие: Gunblades
Вы можете разблокировать задание Gunbreaker, начав квест The Makings of a Gunbreaker в Новой Гридании. Поговорите с Богами Колчан с луком в (X: 11,5, Y: 11,9), чтобы начать квест.
Этот квест включает в себя разборку некоторых разбойников на Брамбл-Патч, которые напали на странных путешественников. Эти путешественники — ваши проводники на пути к тому, чтобы стать стрелком mdash; Виера по имени Софи и хротгар по имени Радован.
Танцовщица
- Роль: бойцы дальнего боя.
- Оружие: чакры
Выполнив все необходимые условия, вы можете стать танцором, выполнив квест Давайте танцевать . Это можно начать, поговорив с нетерпеливым ломинсаном, которого можно найти на нижних палубах Лимса Ломинса в (X: 9.8, Y: 12.0).
В этом квесте вы узнаете о труппе танцоров из Радз-ат-Хана и предложите встретиться с ними. Вас оценит руководитель труппы, госпожа Нашмейра, которая предложит вам Душу танцора в обмен на вашу помощь во время их тура по Эорзее.
Behind the scenes[]
Warrior’s skillset, choice of weaponry, and artifact armors reflect Berserker than rather than the archetypal Fighter or Warrior that appears throughout the series, or even Final Fantasy XI‘s Warrior job. This is alluded to in Shadowbringers with the appearance of a Berserker in Heroes’ Gauntlet, who functions nearly identically to a Warrior with the only real difference being in the use of a greatsword instead of an axe.
The Warrior soul crystal resembles the Taurus Zodiac Stone from Final Fantasy Tactics.
Square Enix’s Eorzea Cafe served a dish called «Roast beef of monsters ~hunted by Marauder~» whose description translates to: Wild beasts hunted by the rock-shattering Marauder done roast beef style. Lather up your opponents in bloodbath sauce and smite them down!
Ultimate raids[]
Ultimate raids are a type of 8-player raid introduced in Stormblood. They are high-end raids that host a gauntlet of bosses from previous duties that must be defeated in a single attempt. Failing will reset the entire gauntlet. They are intended to be of even higher difficulty levels then the Extreme or Savage levels that previously represented the game’s hardest content. These raids require players to have completed the Savage difficulty-level of the previous raid section to even unlock. Due to their high difficulty, Ultimate raids are not intended to be «progression» content for the majority of the player base, and are designed solely for those seeking a challenge.
Ultimate raids have thus far been strictly recreations of older content, with the Unending Coil of Bahamut being based on the Binding Coil of Bahamut raid series, The Weapon’s Refrain being based on the climactic battles of the A Realm Reborn main storyline, and The Epic of Alexander being based on the Alexander raid series.
The next Ultimate raid, tentatively called the Dragonsong War (Ultimate), is planned to be released in patch 6.1, and will be based on the climatic battles of the Heavensward main storyline.
List of Ultimate raids
| Name | Level | Max Item Level | Final Boss | Unlock | Tomestones | Release | |
|---|---|---|---|---|---|---|---|
| The Unending Coil of Bahamut (Ultimate) | 70 | 345 | Bahamut Prime | Complete Deltascape (Savage) | 100 | 4.11 | |
| The Weapon’s Refrain (Ultimate) | 70 | 375 | The Ultima Weapon | Complete Sigmascape (Savage) | 100 | 4.31 | |
| The Epic of Alexander (Ultimate) | 80 | 475 | Perfect Alexander | Complete Eden’s Gate (Savage) | 30 | 5.11 |
Starting Attributes
Note that these differences are quite insignificant as they do not affect stat growth, especially at end-game when you have thousands of points of each stat.
- Main article: Starting Attributes
| Race | Strength | Dexterity | Vitality | Intelligence | Mind | |
|---|---|---|---|---|---|---|
| Hyur | Midlander | 22 | 19 | 20 | 23 | 19 |
| Highlander | 23 | 20 | 22 | 18 | 20 | |
| Elezen | Wildwood | 20 | 23 | 19 | 22 | 19 |
| Duskwight | 20 | 20 | 19 | 23 | 21 | |
| Lalafell | Plainsfolk | 19 | 23 | 19 | 22 | 20 |
| Dunesfolk | 19 | 21 | 18 | 22 | 23 | |
| Miqo’te | Seekers of the Sun | 22 | 23 | 20 | 19 | 19 |
| Keepers of the Moon | 19 | 22 | 18 | 21 | 23 | |
| Roegadyn | Sea Wolves | 22 | 19 | 23 | 18 | 21 |
| Hellsguard | 20 | 18 | 23 | 20 | 22 | |
| Au Ra | Raen | 19 | 22 | 19 | 20 | 23 |
| Xaela | 23 | 20 | 22 | 20 | 18 | |
| Hrothgar | Helions | 23 | 17 | 23 | 17 | 23 |
| The Lost | 23 | 17 | 23 | 17 | 23 | |
| Viera | Rava | 20 | 23 | 18 | 21 | 21 |
| Veena | 19 | 20 | 19 | 23 | 22 |
Задания Stormblood
Чтобы разблокировать два задания, представленных в дополнении Stormblood, вы должны действительно приобрести расширение Stormblood . Кроме того, вы должны уже достичь 50-го уровня работы . Эти квесты не только предоставляют вам Кристалл души и оружие для новичков, но также дают вам Сундук, полный соответствующей брони для данной работы. Эти новые рабочие места начинаются с 50-го уровня.
Самурай

- Роль: физический урон в секунду
- Оружие: Катаны
На ступенях Нальда в Ульдахе вы можете найти гражданина Ульдана в (X: 9.2, Y: 9.1), который может дать вам квест Путь самурая .
Этот квест включает в себя расследование отчетов о пожилом мастере клинка, и вам предстоит бегать по Ульдаху. Он закончится, как только вы получите оценку от Мусосаи, который предоставит вам работу самурая.
Следующий квест от Мастера Мусосаи действует как своего рода руководство к работе, так что сразу приступайте к нему.
Красный маг
- Роль: Магический урон в секунду
- Оружие: Rapiers
Также в Ульда, но на этот раз на Ступенях Тала, находится обезумевшая девушка в (X: 14.1, Y: 11.7). Ее квест — Взятие Красного , откроет доступ к заданию Красного Мага.
Приняв Красный, вы встречаетесь с Красным Магом по имени Иксран Тиа и становитесь свидетелями его великих способностей. Познакомившись с ним немного, он предложит вам Красный Кристалл Души Мага и станет вашим новым наставником.
Lost Fragments
| Lost Fragment | How to Acquire | Lost Actions Unlocked |
|---|---|---|
| Forgotten Fragment of History | Quest: Resolve UnshakenFATEs: Another Pilot Episode, Breaking the IceEnemies: Anancus, Stratogryph, Vinegaroon Executioner | Lodestone |
| Forgotten Fragment of Rage | Quest: Resolve UnshakenEnemies: Zadnor Beetle, Zadnor Dhalmel, Zadnor Gaur | Lost Stoneskin II, Lost Burst |
| Forgotten Fragment of Ferocity | Quest: Resolve UnshakenEnemies: Zadnor Ziz | Lost Stoneskin II, Lost Rampage |
| Forgotten Fragment of Moonlight | Quest: Where Eagles RoostEnemies: Zadnor Crawler | Light Curtain |
| Forgotten Fragment of Hope | Quest: Where Eagles RoostPurchase: Resistance Quartermaster for 5 Bozjan Cluster | Lost Reraise |
| Forgotten Fragment of Artistry | Quest: Where Eagles RoostEnemies: Aglaophotis, Earth Eater, Lord OchuThe Dalriada | Lost Chainspell, Lost Assassination |
| Forgotten Fragment of Desperation | Quest: In Their ShadowEnemies: Zadnor Cliffmole, Zadnor Wamouracampa, Zadnor Yamaa | Lost Protect II, Lost Shell II |
| Forgotten Fragment of Tenacity | Quest: In Their ShadowFATEs: Attack of the Machines, Feeling the Burn, Lean, Mean, Magitek Machines, Looks to Die For, Still Only Counts as One, Worn to a Shadow | Lost Bubble |
| Forgotten Fragment of Inspiration | Quest: In Their ShadowEnemies: Glyptodon, Molten Scorpion, Vapula | Lost Impetus |
| Forgotten Fragment of Heroism | The Dalriada | Resistance Elixir, Lost Excellence |
| Forgotten Fragment of Cunning | The Dalriada | Resistance Elixir, Lost Blood Rage |
| Forgotten Fragment of Revelation | The Dalriada | Resistance Elixir, Lost Full Cure |
Loot
Chopper
| Name | Type | Rarity | Quantity |
|---|---|---|---|
| Acolyte’s Halfgloves | Hands | Dungeon | 1 |
| Aetherial Brass Gorget | Necklace | Aetherial | 1 |
| Aetherial Brass Wristlets | Bracelets | Aetherial | 1 |
| Foestriker’s Mitts | Hands | Dungeon | 1 |
| Plundered Cavalier’s Hat | Head | Dungeon | 1 |
| Plundered Celata | Head | Dungeon | 1 |
| Plundered Ear Cuffs | Earrings | Dungeon | 1 |
| Plundered Earrings | Earrings | Dungeon | 1 |
| Plundered Gauntlets | Hands | Dungeon | 1 |
| Plundered Goggles | Head | Dungeon | 1 |
Captain Madison
| Name | Type | Rarity | Quantity |
|---|---|---|---|
| Plundered Cuirass | Body | Dungeon | 1 |
| Foestriker’s Tabard | Body | Dungeon | 1 |
| Acolyte’s Robe | Body | Dungeon | 1 |
| Plundered Trousers | Legs | Dungeon | 1 |
| Foestriker’s Skirt | Legs | Dungeon | 1 |
| Acolyte’s Skirt | Legs | Dungeon | 1 |
Denn the Orcatoothed
| Name | Type | Rarity | Quantity |
|---|---|---|---|
| Plundered Falchion | Sword | Dungeon | 1 |
| Plundered Battleaxe | Greataxe | Dungeon | 1 |
| Plundered Guisarme | Polearm | Dungeon | 1 |
| Plundered Knuckles | Fist Weapon | Dungeon | 1 |
| Plundered Knives | Daggers | Dungeon | 1 |
| Plundered Shortbow | Bow | Dungeon | 1 |
| Plundered Staff | Staff | Dungeon | 1 |
| Plundered Grimoire | Book | Dungeon | 1 |
| Plundered Cane | Cane | Dungeon | 1 |
| Warded Round Shield | Shield | Dungeon | 1 |
| Plundered Plate Belt | Waist | Dungeon | 1 |
| Plundered Leather Belt | Waist | Dungeon | 1 |
| Plundered Rope Belt | Waist | Dungeon | 1 |
| Plundered Sabatons | Feet | Dungeon | 1 |
| Foestriker’s Boots | Feet | Dungeon | 1 |
| Acolyte’s Thighboots | Feet | Dungeon | 1 |
| Sahagin Card | Triple Triad Card | 1 | |
| Faded Copy of Riptide | Orchestrion Roll | Basic | 1 |
Treasure Coffer 1 (X: 13.8 Y: 9.2)
| Name | Type | Rarity | Quantity |
|---|---|---|---|
| Plundered Plate Belt | Waist | Dungeon | 1 |
| Plundered Leather Belt | Waist | Dungeon | 1 |
| Plundered Rope Belt | Waist | Dungeon | 1 |
| Plundered Sabatons | Feet | Dungeon | 1 |
| Foestriker’s Boots | Feet | Dungeon | 1 |
| Acolyte’s Thighboots | Feet | Dungeon | 1 |
| Seagrot Water | Crafting material | Basic | 1 |
Treasure Coffer 2 (X: 11.2 Y: 14.7)
| Name | Type | Rarity | Quantity |
|---|---|---|---|
| Plundered Celata | Head | Dungeon | 1 |
| Plundered Goggles | Head | Dungeon | 1 |
| Plundered Cavalier’s Hat | Head | Dungeon | 1 |
| Plundered Gauntlets | Hands | Dungeon | 1 |
| Foestriker’s Mitts | Hands | Dungeon | 1 |
| Acolyte’s Halfgloves | Hands | Dungeon | 1 |
Treasure Coffer 3 (X: 10.9 Y: 13.2)
| Name | Type | Rarity | Quantity |
|---|---|---|---|
| Plundered Cuirass | Body | Dungeon | 1 |
| Foestriker’s Tabard | Body | Dungeon | 1 |
| Acolyte’s Robe | Body | Dungeon | 1 |
| Plundered Trousers | Legs | Dungeon | 1 |
| Foestriker’s Skirt | Legs | Dungeon | 1 |
| Acolyte’s Skirt | Legs | Dungeon | 1 |
Treasure Coffer 4 (X: 7.9 Y: 13.7)
| Name | Type | Rarity | Quantity |
|---|---|---|---|
| Plundered Falchion | Sword | Dungeon | 1 |
| Plundered Battleaxe | Greataxe | Dungeon | 1 |
| Plundered Guisarme | Polearm | Dungeon | 1 |
| Plundered Knuckles | Fist Weapon | Dungeon | 1 |
| Plundered Knives | Daggers | Dungeon | 1 |
| Plundered Shortbow | Bow | Dungeon | 1 |
| Plundered Staff | Staff | Dungeon | 1 |
| Plundered Grimoire | Book | Dungeon | 1 |
| Plundered Cane | Cane | Dungeon | 1 |
| Warded Round Shield | Shield | Dungeon | 1 |
| Nightprowler’s Targe | Shield | Dungeon | 1 |
| Pirate’s Bandana | Head | Dungeon | 1 |
| Plundered Haubergeon | Body | Dungeon | 1 |
| Plundered Jacket | Body | Dungeon | 1 |
| Plundered Bliaud | Body | Dungeon | 1 |
| Plundered Moccasins | Feet | Dungeon | 1 |
| Plundered Duckbills | Feet | Dungeon | 1 |
№1 — Астролог
Если вы заинтересованы в освоении бесспорных лучших во время Shadowbringers, то перейдите на Астролог — наш номер один в этом списке. После неудачного запуска в начале Heavensward Square Enix сгладила проблемы с помощью последнего добавленного класса исцеления, и с тех пор они безраздельно властвовали.
Астрологов так любят в основном потому, что этот класс ни в малейшей степени не жаден, поскольку они несут в себе полезность для всего рейда, которая дает вашей группе большие баффы урона в виде карт. Эти карты, если их применить правильно, могут привести к победе над грозными боссами на соревновательной скорости в FF14. Весь их набор основан на идеальном жонглировании этими картами, исцелении своих союзников и нанесении индивидуального DPS. Это также оставляет их в самом тяжелом положении из трех, и часто считается, что они требуют высочайшего мастерства для игры.
Они хорошо взаимодействуют с любой группой, но астрологи также обладают уникальной способностью переключаться между двумя разными позициями — дневной сектой и ночной сектой. Эти стойки дают им возможность использовать регенерацию или щиты с помощью своих навыков, что делает их больше похожими на Белого мага или ученого, в зависимости от вашей секты. Вы можете переключаться между этими стойками в зависимости от того, какую роль играет ваш сподвижник, делая астрологов готовыми выполнить любые потребности их группы. Однако не стоит слишком привыкать к этому стилю игры. В Endwalker астрологи станут чистым лечебным классом и потеряют свои способности щита, что сделает их более гармоничными с Белым Магом.
Рекомендуем ознакомится с другими гайдами на популярные игры tattoo-mall.ru. Расскажем про секреты и хитрости, которые можно использовать в играх со своей выгодой. А также про полезные и интересные историй в видеоиграх.
Если вы готовы принять вызов и чувствуете, что можете участвовать в дополнительном микроменеджменте, который требует Астролог, выберите целителя, использующего земной шар. Даже если бы они были бесполезны, это изящное оружие все равно принесло бы им первое место.
Level 11 — 20
| Item | Icon | Level | Item Level | Damage | Delay | Auto Attack | Materia Slots | Stats and Attributes |
|---|---|---|---|---|---|---|---|---|
| Starseeker | 13 | 13 | 11 | 2.80 | 10.26 | Dexterity +2, Vitality +2, Critical Hit +3, Determination +2 | ||
| Wrapped Maple Longbow | 13 | 13 | 10 | 3.36 | 11.20 | Dexterity +2, Vitality +1, Determination +1 | ||
| Aetherial Ash Shortbow | 15 | 15 | 12 | 2.80 | 11.20 | Dexterity +3, Vitality +2 | ||
| Ash Shortbow | 15 | 15 | 11 | 2.80 | 10.26 | 2 | Dexterity +3, Vitality +2, Skill Speed +2 | |
| Plundered Shortbow | 15 | 17 | 13 | 3.04 | 13.17 | Dexterity +3, Vitality +3, Critical Hit +4, Determination +1 | ||
| Aetherial Elm Longbow | 17 | 18 | 13 | 3.36 | 14.56 | Dexterity +3, Vitality +3 | ||
| Elm Longbow | 18 | 18 | 12 | 3.36 | 13.44 | 2 | Dexterity +3, Vitality +2, Determination +2 | |
| Aetherial Elm Velocity Bow | 20 | 21 | 15 | 2.80 | 14.00 | Dexterity +4, Vitality +4 | ||
| Doctore’s Armored Bow | 20 | 22 | 15 | 2.64 | 13.20 | Dexterity +4, Vitality +4, Critical Hit +3, Direct Hit Rate +5 |