Bestiary
Содержание:
Gameplay
Dragon’s Dogma allows the player to create their own character, whose gender and appearance can be altered to the player’s liking. The player can select one of three classes (called Vocations) for their character.
- Fighter — A class focused on attacking. Uses swords and shields for blocking enemy attacks.
- Mage — A class focused on magic. Uses staves.
- Strider — A class focused on speed. Uses daggers for close combat and bows for ranged attacks
Players will be given three AI controlled teammates called Pawns, who can be issued commands, such as «Go«, «Help«, and «Come«. These characters will assist the player by giving information about enemies, among other things.
Dragon’s Dogma offers a new feature to the action game genre: allowing the player to grab onto enemies to allow for a more varied means of attacking. For example, the player can grab onto the legs of a Griffin and then climb up it to attack its head for more damage.
A huge open world set in the land of Gransys full of monsters will be available for the player to explore and quest within, as well as a large city environment, in which over 200 NPCs who will freely go about their day-to-day lives. These NPCs can be talked to with full voice acting.
Players will supposedly be able to look forward to between 30 and 100 hours, the former being for players who play normally, and the latter for players who wish to play the game to its fullest.
Enemies
Inhabitants include several Undead, Undead Warriors, Stout Undead, Giant Rats, Spiders, Phantoms, Skeletons including Skeleton Knights and Skeleton Mages, and a lesser Ogre.
During the quest A Parting Gift a Specter may be encountered, and during the Dark Arisen quest An Unseen Rival III two Living Armors.
Entrances and exits
The Catacombs’ main entrance is to the north of Deos Hills with a Riftstone next to it. Two other entrances to the Catacombs exist, but are initially blocked :
- Under the large bridge over the river near Gran Soren — an entrance in the bridges foundations, south of the Storage Shed (Catacombs Rear Passage 2) connecting to the northwestern part of the Catacomb’s ‘Third Level Underground’
- An entrance close to the Collapsed Meeting Room in the Estan Plains outside Gran Soren (Catacombs Rear Passage 1), connecting to the southestern part of the ‘Second Level Underground’.
Lower levels
The lower level (First Level Underground) can initially only be accessed via a lift. Underground tunnels and caverns lead to a second area of the Catacombs. Here the Gathering Hall chamber, in which the Arisen encounters Julien and the Elysion during Seeking Salvation has several «Remaining Eye» symbols painted on its walls. From this region there are the two minor exits from these caverns to above ground.
The path to the very lowest level is barred by locked gates — the gate on the first floor, next to the lift, is unlocked by the First Key To Salvation; the double gates on the second level, leading to a group of Stout Undead, is unlocked by the Second Key To Salvation. Within the lowest level is the Confessional Chamber, locked behind a magic door.
Pawn Chatter
On entering from the Deos Hills entrance
- «The crypt was fashioned ages ago, before the Faith came to Gransys.»
- «… Long ago, when the people worshipped the old gods, the gods of nature.»
- «… I suspect it’s why they returned their dead to the soil. To the Earthgod.»
- «Few come to offer prayers for those who rest here in the catacombs. That their souls might be cleansed and born anew in the coming generations.»
- «If ever it was the seat of a god, that time has surely past.»
On the inhabitants
- «Be careful — the walking dead are all around us.»
- «Undead sleep beneath the earth!»
- «To judge from the beasts that dwell here, the place holds a dark power.»
On the sarcophagi
- «I believe some of the coffins are booby trapped.»
- «If you see gas leaking, ’tis likely a gas trap.»
On the lamps
- «The lamplight will make spotting traps easier.»
By the hidden room
- «Would that we had some manner of foothold…»
- «I’d wager we could scale that wall.»
In the natural tunnels
- «If monsters appear, let’s take advantage of the uneven tarrain.»
- «The Pawn legion make no graves. No need.»
- «What dark, forgotten age saw this place built…?»
Walkthrough
This quest can be solved in two different ways: both paths will give the same amount of Experience Points and Rift Crystals, although the cost and other rewards received will vary based on the outcome. The first option would be to evict the tenants while the second option would be to buy the land from Fournival in order to allow the tenants to stay.
Negotiate the Eviction

(5 ~ 2) Dragon’s Dogma ~ Land of Opportunity Hero Trophy Guide
Land of Opportunity ~ Video Walkthrough
After receiving the quest from Fournival, proceed to locate each of the family of three living on the property.
- Jasper can be found behind the inn during the afternoon, preaching about The Dragon. When first approached, he will state that he cannot make the decision to move out without the consent of his whole family and requests that the player first speak to them about it.
- Sara can be found at the Fountain, in the Alehouse or browsing the market next to the inn. Sara is rather indecisive and requires time (one day has to pass) before she makes up her mind and agrees to move out.
- Pip can be found around the Fournival Manor. Initially he will get angry upon being notified, and will run off. He will be next found on top of the barn in the Craftsman’s Quarter and can be reached by jumping from the rooftop of the adjacent building. He will repeat his refusal and run off a second time, to be found underneath a bridge in the Urban Quarter. Here he will attempt to flee again and a mini-event occurs where the Arisen must catch him similar to the quest; An Uninvited Guest. Do NOT attack him, as this will get the player jailed. Once caught, Pip will give up and give his consent.
After speaking to all three people at least once (regardless of whether they have all agreed to move or not), the Arisen now has two different options:
Confirm the Eviction
To confirm the eviction, Pip must be chased and caught, and Sara must make up her mind. Once Pip has been caught and Sara has been given enough time to think about her decision (talk to both of them again to be sure), speak with Jasper. He will request that the Arisen front him and his family 30,000 G — this payment cannot be avoided and must be paid to complete the quest.
Finally, return to Fournival to complete the quest for a reward of 40,000 G.
Cancel the Eviction
After talking with Jasper, Sara and Pip without taking either of the latter two’s approval, Fournival will ask how the eviction is going and admit that the whole process is becoming quite the hassle. To this end, he will propose that the Arisen buy the land for 80,000 G, which removes his need to evict the family. In this case the Arisen will be out of pocket and will not receive the gold reward for a successfully negotiated eviction.
Note that Fournival is merely providing an alternative. If you do not agree to buy the land, you can still return to Jasper to confirm the eviction.
Agreeing to purchase the land and allow the tenants to stay will net the Arisen several rewards from the family when speaking to them afterwards. They can be found in their usual locations after the quest is complete.
- Jasper will give an Antique Panoply
- Sara will give a Matured Greenwarish
- Pip will give a Pretty Stone
Quest complete
Either buying the land or evicting the tenants successfully completes the quest, granting a reward of 5,000 Exp. and 10 Rift Crystals.
Интересные факты[править]
При этом мировоззрение и сюжетная основа явно демонстрируют влияние восточных философий и религий с отсылками на реинкарнацию, перерождение и бесконечные циклы. Уровень технологии Грансиса — это уровень классического «высокого средневекового фэнтези», так как никакого огнестрельного оружия не наблюдается, но существуют простые пороховые устройства, такие как и баллисты. Присутствуют также стандартные элементы фэнтези, вроде магии, алхимии, амулетов, зелий, магических книг и свитков и т. д. Элементарная магия отсылает как к восточной, так и западной философии. История Воскресшего, с её акцентом на воле как ключе к существованию, перекликается с интерпретациями некоторых концепций, введенных немецкими философами, включая «Волю к власти» Фридриха Ницше и «Волю к жизни» Артура Шопенгауэра.
Если затрагивать тему более современных источников вдохновения создателей игры, то можно отметить мангу Berserk. В игре даже присутствуют доспехи и оружие Гатса и Гриффита — в рамках официального сотрудничества. Также, как уже было отмечено, Селена имеет определённое сходство с Ширке.
Trivia
- Purely for laughs, the citizens of Gran Soren may be grabbed and thrown into the Everfall with minimal consequences. Tossing Arsmith and Mountebank into the Everfall in this manner, however, will temporarily deprive the party of their services (until they re-spawn 7 in-game days later).
- The fifteen chambers of the Everfall are named after reactions or states of mind which can be caused by loss, in what is a plausible order of their coming.
- Chamber of Hope, being the last, may be a reference to saying «Hope dies last».
- Chests at circular rooms of Chamber of Estrangement, Chamber of Fate and Chamber of Resolution spawn separately for each enemy set and technically may be looted twice per visit.
Overview
| Type |
|
|---|---|
| Experiencegained | Base Experience of 25,000
Can be more or less depending on a few factors such as:
|
| Location |
Devilfire Grove’s Drake Estan Plains’ Drake Conqueror’s Sanctuary’s Drake Gransys Devilfire Grove
|
|
|
On death Dragon Scale (20%), Amber Dragon Scale (32%), Dragon Claw (12%), Indurated Dragonsblood (5%), Rift Cluster (5%), Drake’s Tear (5%), Dragon Horn (1%), Greatwyrm Stone (1%) Drake Horns destroyed Dragon Horn (100%) Drake Wing destroyed Great Dragon Alula (80%), Dragon Scale (14%), Amber Dragon Scale (5%), Drake’s Tear (1%) |
Stats
|
|||||||||||||||||||||||||||||||||||||
|
|||||||||||||||||||||||||||||||||||||
|
|||||||||||||||||||||||||||||||||||||
| Sources: Dragon’s Dogma — ドラゴンズドグマ & Dark Arisen (www10.atwiki.jp), the Dragon’s Dogma Signature Series Guide, List of Creature Debilitation Resistances, and in-game testing. |
- † The Conqueror’s Sanctuary Drake has higher defense (around 510), and considerably higher attack and aggression
Damage is modified relative to the Drake’s stats depending on where it is struck.
- Blows to the heart receive a 0.75x damage multiplier.
- The head receives a 0.3x multiplier.
- The wings receive a 0.3x multiplier.
- Other areas such as the tail, legs and body are even more armored and take very little damage, often 7.5% (0.075x) of calculated damage or even half that
- Both magick and physical damage are affected
- A reeling drake takes double normal damage
- When possessing a pawn damage is increased by 33.3%
Damage is also increased for physical bow users, and melee attacks when climbing
- Melee attacks from climbers get an additionally 1.5x damage boost (strider gets a further boost)
- Longbow and shortbow damage is doubled (when hitting the heart or head)
Attacks
| Attack | Type | Description |
|---|---|---|
| Fire Breath | Mag | A massive stream of fire is blasted from its mouth. Can cause Burning. The Drake can use this move either when pacing forward or backing away from its target(s). |
| Charge | Phys | Charges at a target on the ground to trample it. |
| Grab (Arisen) | Phys | The Arisen is grabbed and then slammed into the ground. |
| Grab (Pawn) | Spec/Status | A Pawn is grabbed but instead of being slammed into the ground, the Drake tries to seize control over the pawn. Causes Possession, which turns the Pawn against the Arisen. |
| Slam | Phys | Will take flight then drop suddenly to slam its torso into the ground, inflicting massive damage to anyone underneath. |
| Aerial Spin | Phys | If the Arisen or one of his/her Pawns are holding onto the Drake while it is in flight, it will spin rapidly, draining a massive chunk of stamina. |
| Stomp Attack | Phys | A powerful attack with its feet, staggers targets. |
| Sweeping Backhand | Phys | A backhanded slap with one of its front claws. |
| Tail Sweep | Phys | A powerful spinning attack with its tail, knocks targets off their feet. |
| Wing Flap | Phys | Powerful wing flaps that create strong winds preventing the party from approaching. |
| Dragon Roar | Spec/Status | A mighty roar that kills all Pawns within range, staggers the Arisen and can cause Skill Stifling, as well as rendering pawns unconscious. Dragons will immediately Roar in retaliation when one of its horns are destroyed, or when its wings are disabled.
A drake also roars when its heart is first exposed, but this does not skill stifling or render pawns unconscious |
| Fiery Drive By | Mag | After spending enough time in the air, while the party is using cover, flies up into the sky and then dives past a target, breathing fire, eventually clash landing at the target’s position similar to Griffin. The Dragon may perform multiple passes before landing again. |
- When a Dragon Horn is destroyed, Pawns will declare «The horn is destroyed!» and a piece of Dragon Horn will drop. There is a horn on either side of the head.
- Destroying the wings causes Pawns to declare «‘Tis grounded, Master!» or «On solid ground, the advantage is ours!» , and a Great Dragon Alula will drop.
- Intact horns can be destroyed after the Dragon is slain, likewise, an alula may by obtained by striking a dead Dragon’s back where the wings intersect.
Notes
- Ophis is not bothered if the party includes males taken on escort quests.
- Like all bandits, she likes Skulls as a gift. She also appears to enjoy gifts of Harspud Sauce, as a traveller.
- Carrying Ophis’ Badge of Amity nullifies her dislike of males, enabling un-molested transit through the fort.
- Slaying her pet Cyclops then talking to her gives dialog about those events whose news she received from Betiah.
-
(BUG) ps3, xbox360 In Dragon’s Dogma
This can be fixed by attacking her with fists. Attacking her with weapons may kill her easily so it is advised to attack with bare hands. Deal some damage so players can carry her. Once carried, jump down from her castle and continue to carry her outside from her domain. Players can carry her to the area where the cyclops is located on the narrow passage. Drop her and she will just frown for carrying her like the other characters do. Once she does that, speak to her. When Ophis is outside from her domain, the game resets her status and does not become hostile to male characters. She only acts as a unique character when she is in the Heavenspeak Fort.
it is possible for the players to have difficulties in speaking with Ophis. Ophis and her bandits may be hostile to the Arisen regardless if they and their party are dressed as females or after feeding Ophis’ cyclops, she may not prefer to speak with the Arisen, no matter what is done.
Walkthrough
This quest becomes available after meeting the Duke in the quest Come to Court.
From Fedel to the Cursewood
Speak to Fedel within the Duke’s Demesne in Gran Soren to obtain this quest. Fedel seeks a meeting after nightfall to explain the sensitivity concerning the loss of the letter.
The destroyed cart
Sleep at the inn until night and head to the Duke’s Demesne in the Noble Quarter.
Avoid the night guards and wait for Fedel by the gazebo in the eastern garden area. Fedel takes time(upto 5 minutes) to come out, so be patient. There, Fedel will explain his quest and direct the Arisen to a location in the Cursewood where the lost confidential report was stolen by flying monsters.
At the crossroads in the Cursewood, the Arisen will find the remains of Fedel’s cart and a Gargoyle will be seen flying away to the northwest towards Soulflayer Canyon.
Into Soulflayer Canyon
Now travel to Soulflayer Canyon to retrieve the letter. Reaching the correct ledge in the canyon can be a little tricky, but a pawn with full knowledge of this quest and Soulflayer Canyon will lead the Arisen directly to it.
From the west entrance, take a left at the passage fork. After slaying the Cyclops on the bridge, continue straight until reaching a treasure chest on the left side and a steep downward grade on the right side. Slide down the left side of this grade to the landing with two Godsthrone Blossoms (sliding down the right side leads to the main entrance). Slide down two more times toward the left to another area that may contain a snake and two spiders.
Collect some gold pouches, a Panacea and two Sconces on the left before encountering yet another downward slide. Slide down the right side of this downward grade to a landing with more gold pouches, the fleeing Gargoyle, quest items scattered on the ground, and a chest containing a Steel Beak.
Slay the Gargoyle and collect the Confidential Letter as well as the Parcels lying scattered on the ground and return to Gran Soren.

The Conspirators (quest walkthrough through the east entrance of Soulflayer Canyon)
Walkthrough entering Soulflayer Canyon from the east (Cursewood)

The Conspirators (quest walkthrough)
Walkthrough entering Soulflayer Canyon from the west (Barta Crags)
If entering from the east, just traverse the tunnels of the canyon until the fork after the west entrance is reached, and continue as above.
Return to Gran Soren
Back in the capital, one may want to make forgeries of the Confidential Letter at the Black Cat afore handing it in.
Upon entering the Duke’s Demesne, the Arisen will be accosted by Ser Gabrian who was lurking behind a corner to the right of the entrance. This is the only opportunity to speak to Ser Gabrian. Either give him a copy or refuse. If refused, the letter must then be taken to Fedel.
The quest ends when the Arisen brings back the Confidential Letter to Fedel, or Ser Gabrian.
Rewards and outcomes
By forging the letter, the Arisen can obtain the gold and experience reward for the quest twice: first when giving one to Ser Gabrian near the entrance, and the second to Fedel. To collect both rewards, Ser Gabrian must be given his copy first, then Fedel the second one.
The storyline will not be altered either way the Arisen handles this quest, though Fedel is correct about signs of a rebellion. It seems the letter refers to the soldiers who later rebel at Windbluff Tower. Ser Gabrian is almost certainly trying to intercept the letter and thus is in league with the treachery at Windbluff Tower.
The sedition reaches its peak during the revolt in the later quest Pride Before a Fall.
- Obtaining both rewards
Once Ser Gabrian is given the letter (or a forged copy of it), the quest will be marked as «Completed». However, the Arisen can still deliver a copy of the letter to Fedel upstairs in the castle.
- If the current active quest does not involve Fedel, he will have a blue question mark indicator over his head. He may speak as though the quest failed, but it will still be possible for the Arisen to give him the letter.
- If the player plans to give Ser Gabrian a Confidential Letter Forgery, carry an original Confidential Letter in the Arisen’s active inventory or the cutscene will not trigger.
Как изменить внешность?
Во время прохождения игры вы получите несколько возможностей для изменения внешности персонажа. Отправляйтесь в столицу «Гран Сорен» и отыщите там парикмахерскую, в которой можно будет изменить внешность героя в умеренных рамках — причёска, макияж, усы и т. д. Если вы хотите изменить внешность персонажа глобально, то придётся использовать предмет под названием Art of Metamorphosis (Искусство метаморфоза). Используется он один раз за всю игру!
С другой стороны, после прохождения основной сюжетной кампании у вас появится предмет Secret of Metamorphosis (Секрет метаморфоза). Точнее, появится возможность использования этого предмета, который нужно будет купить и Джонатана на локации «Лагерь» (The Encampment).
Lore
Dragons are creatures wreathed in mystery. Though they have appeared a handful of times in the long history of the continent, it is still not clear how they are born or what brings them to attack men’s civilizations. The small amount of knowledge that has been gleaned from their sporadic attacks reveals little more than the facts that dragons possess dreadful power and are intelligent enough to understand human speech. Dragons appear without warning, sometimes dozens, sometimes hundreds of years apart, bringing chaos in their wake and destroying men and nations without distinction. Their actions are inhuman and atrocious, but given their high level of intelligence, it is hard to imagine that their violence is without purpose. Many times in the past have they brought the world to the edge of destruction, but they have never completely wiped out mankind. In every age that they appear, the dragons commit a short-lived but ferocious assault upon the world. Then they cease their attack and alight atop a mountain or other visible location, as if waiting for something. Given these strange actions, it is possible to think that the dragons are fulfilling some sort of role or duty, serving some greater function in the world, yet at present there is simply not enough evidence to make any sort of theory about the dragons’ purpose. It is also clear from past records that the number of monsters in the world seems to sharply increase around the time that a dragon appears. This could be nothing more than coincidence, but if it is somehow an effect of a dragon’s imminent appearance, then this would be another example of dragons’ peculiar place in the natural order of the world.
Capcom official description
Grigori is a giant red dragon, similar to the fire breathing Drake, but many times more powerful.
It is thought that the Dragon’s corporeal strength is made up of the hearts of his victims, the Arisen. In truth it is later revealed that he was once a «pawn», and furthermore, a former Arisen. His purpose is to serve as a test for persons of strong character who might one day take up the post of Seneschal. The Dragon himself was created from an Arisen who failed at the final step — vanquished by the Seneschal.
As holder of the hearts of Arisen, they, through the Dragon’s protection, are given virtual immortality, and do not age — however, should the Dragon be slain, their age catches up with them, as the release of the hearts the Dragon holds makes them mortal again.
Arisen meeting the challenge of the Dragon are traditionally given a Faustian choice: face him in battle, or exchange the life of a loved one for any worldly power they could desire. By accepting the bargain, an Arisen becomes the thrall of the Dragon and their quest ends. But if the Arisen accepts the challenge, they have the opportunity to defeat him, win back their heart — or die trying.
Lore notes
- See also: Dragon’s Dogma World and Lore
- The Faith keeps records and scriptures concerning knowledge of the Dragon — and for this reason the Arisen’s childhood friend Quina joins them in an attempt to find a cure for the wound the Dragon inflicted.
- The nihilist cult known as Salvation worships the Dragon, or at least the destruction he brings.
- According to the monk Haslett, the Dragon will ‘roar thrice’ — the interpretation of this is unclear, though the Arisen will encounter the Dragon only three times during their quest.
- The events leading to the ending Servitude show the process by which a new Dragon is created: If the Arisen fails to defeat the Seneschal during the quest Final Judgment, they will transform into a Dragon; thus continuing the cycle.
- It is certain the Dragon encountered by Savan during the quest The End at the Beginning is not Grigori, since he must have slain a Dragon during events that occurred long ago.
Olra’s tale
|
||
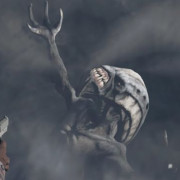
Olra the pawn
Ghostly apparation of the former pawn Olra
- For details of the sources, see Monument of Remembrance.
The Pawn Olra was created by Grette, an Arisen of an ancient time. During their travels they met an orphaned boy named Ashe in the ruins of a village, who became an apprentice to Grette. Grette became both a mentor and mother figure to the boy. Eventually Grette and her pawn left him to fight the Dragon, but only the pawn returned, as a husk, masterless.
Grette and her pawn had fought and killed the Dragon, but had failed at the final step and Grette was slain fighting the Seneschal, thus she was transformed into the next Great Dragon. Ashe fell in love with Olra, and she with him — he made it his quest to return some light to the lost pawn’s existence, and to avenge Grette and slay the dragon, not realizing that the dragon was actually Grette.
Ashe took Olra as his main Pawn — but in a cruel twist of fate, the Great Dragon captured Olra and it offered Ashe its choice — either defeat it or sacrifice Olra. However, as the Dragon was also the husk of Grette, the choice was essentially sacrifice his love or kill his surrogate mother. Ashe could not make the choice, and instead cursed the cycle itself. The Dragon then slew Olra, and cursed Ashe, transforming him into Daimon. Daimon went mad with grief and transformed the land into the massive underground complex known as Bitterblack Isle.
Although Ashe failed in his quest, his wish to return the light to the pawn Olra was in a sense fulfilled — the spirit of the pawn entered the body of a slain Arisen.
Olra the Arisen
- «I…I died once. Here, in this place. It was scarce a fortnight after I was first lured in. Each day brought new losses. My pawn was slain, then gradually my store of curatives dwindled. I was surrounded, body battered and broken by dark and powerful magicks. As death approached, I lifted my gaze to see the stars one final time. Yet it was not death that engulfed me then, but a strange light, far brighter than any fire of the empyrean. …past that, my memory fails.»
- — Olra’s account of her former life as Arisen, and death
Even after being sacrificed, Olra’s spirit wanted to save Ashe from this vile fate and decided to find Arisen that may help free Ashe.
The pawn’s spirit possessed an Arisen who had been slain within Bitterblack, and then sought to draw other Arisen to Bitterblack Isle so that they might seek to free her master and lover, Ashe, from the curse.
Little else is known about the life of the Arisen that the pawn Olra possessed.
Как телепортироваться? Как быстро перемещаться в игре?
Быстрое путешествие в Dragon’s Dogma осуществляется за счёт телепортации. В разных местах вы можете встретить низкие кристаллы, торчащие из земли. Они называются Portcrystal (портальный кристалл) и используются несколько иначе, чем вы могли подумать. Покинуть локацию с помощью такого кристалла нельзя, однако сюда можно переместиться, если использовать специальный камень под названием Ferrystone (камень перемещения). Откройте вкладку «Инструменты» (Tools) в инвентаре, чтобы найти те самые камни перемещения. Используйте один из них, чтобы оказаться в одной из точек с портальными кристаллами. После использования такого кристалла он исчезнет. Для каждого быстрого перемещения вам придётся расходовать один кристалл.
Notes
- The Catacombs may be explored at any time, even before the quests Seeking Salvation and Rise of the Fallen.
- Falls down the lift shaft pit are always fatal (even when mitigating Fall Damage with Skull Splitter). However a fall from the upper to lower level onto the lowered lift plate is relatively safe but painful.
- The Catacombs teem with Undead — any form of Holy based weapon or magic is recommended. Fire is almost equally as effective.
- There is a hidden room on the First Floor of the Catacombs, which pawns will draw attention to — vocations with limited jumping skills can make use of a nearby indestructible crate to gain access to the room via a broken high wall section.
- A number of the Sarcophagi are booby trapped and may inflict Curse upon opening.
- The underground geography does not line up with the overground exits — the exit from the 3rd Level Underground (usually first found during Seeking Salvation) should be far to the west of the exit under the bridge near Gran Soren — almost under the Wilted Forest in fact.
The Dragon’s Dogma Official Design Works (p.291) says that it was used to bury the victims of a plague.
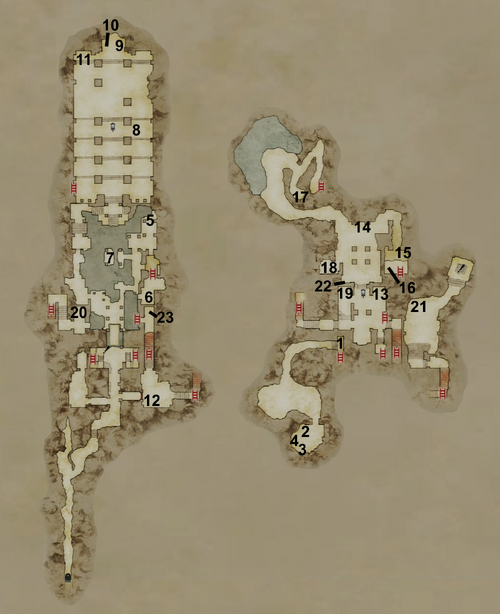
Loot
The temple is quite rich in useful items including weapons and armor. Additionally, several Ore deposits may yield Priceless Artifacts, which are unique to this area. Also found only here are Waterfell Gentian Leaves and Waterfell Gentian Roots both from the same plant species.
Chests
There are five chests holding Altar Slates, and another holds the Watergod’s Altar Lever.
- Note, some chest loot incomplete
| Map
|
|||
|---|---|---|---|
| Chest | Loot | Chest | Loot |
| 1 | Eden’s Warden, Thunderclap, Grievous Horns, Demon’s Periapt | 13 | Altar Slate |
| 2 | Ferrystone, Dragon’s Spit, Giant Coin Pouch | 14 | Cleansing Earring, Golden Ring |
| 3 | Bronze Gauntlets, Silver Bands | 15 | Cyclops Strategy Vol. 2, Serenity Extract |
| 4 | Watergod’s Altar Lever | 16 | Tiger Bangle, Iron Boots, Winter’s Path Tome |
| 5 | Iron Helm, Bronze Cuirass, Dragon’s Spit, Panacea, Golden Egg | 17 | Altar Slate |
| 6 | Altar Slate | 18 | Altar Slate |
| 7 | Iris Ring, Ring of Azure | 19 | Missionary’s Robe, Hunter’s Jacket, Conqueror’s Periapt, Interventive |
| 8 | Padded Armor, Battle Greaves, Cleansing Earring, Large Coin Pouch | 20 | Altar Slate |
| 9 | Light Outfit, Chainmail Bracers, Violet Ring | 21 | Obliteratrix, Direwolf Bow, Surcoat |
| 10 | Red Leather Cap, Twilight Hood, Ring of Purpure | 22 | (on a broken wall betwen upper and lower levels)Padded Armor, Silver Ring, Panacea or thrown explosives. |
| 11 | Blast Arrow, Blinder Arrow, Harspud Milk, Gold | 23 | Tiger Bangle, Iron Boots, Light-Cure |
| 12 | Scale Greaves, Blue Longkilt, Martyr’s Talisman, Saurian Tactics Vol. 1, Liquid Vim | ||
| Weapon Piles and Gather Spots | |||
|
In the Offering Chamber:
In the room beyond the magick door opened by the Watergod’s Altar Key : A Weapon Pile may yield : Liquid Vim, Salubrious Brew, Harspud Sauce, or Interventive by day; by night an Iron Shield is common, and Rusted Daggers, Silver Ring, or Foreign Knife may be found. |
Speculation
- See also: Dragon’s Dogma World and Lore
One likely theory, is that the Dragonforged faced the Dragon in battle, but was forced to fight with his hands due to his weapon (a spear) breaking — evidence for this is the Dragonforged burnt arms, and the tip of a broken spear found at the Hillfigure Knoll (see Signs of Valor) — there are cryptic references to these on inscriptions inside the Dragonforged cave. His moniker «Dragonforged» could be a reference to having fought a Dragon barehanded, as Dragonforging is usually applied only to weapons used against a Dragon.
The Fool tells the Arisen that «The Dragonforged suffered mortal injury in combat with the wyrm, ..» — so it is clear he fought the Dragon, but neither can have been victorious. What happened thereon is a matter of speculation.
Most of these theories rely on Leonart/The Dragonforged accepting the Dragon’s pact — however it is known that the Dragonforged did fight the Dragon — perhaps he was forced into a bargain or sorts on being unable to obtain victory. His own words speak to his sense of failure, not to outright capitulation. Perhaps both achieved a victory of sorts, not by killing the Dragon, but at least driving it back for a time.
As he notes in his conversations with the Arisen that he did not trust in other people- perhaps was not close enough to anyone to have a beloved to sacrifice like the Duke and the present day Arisen, and so was unable to form a pact. A further possible complication is that guilt about his any sacrificial decision he had to make may have ‘clouded’ the Dragonforged’s memory of it.
Godking Leonart and other unlikely speculation
Distant relatives ?
An extended theory conflates The Dragonforged, this king, and Godking Leonart all as the same person (making him a distant relative of Aelinore) — though there is little direct evidence for this. However the plot of the novel Dragon’s Dogma : The Beginning reveals Leonart as having taken the Dragon’s bargain before Savan, and so should have died of old age sometime after Savan defeated the Dragon. (Leonart’s fate is unknown)
It has been supposed that the Dragonforged may have been leader of the great kingdom the Arisen sees later in the game, at The Tainted Mountain, to which the Dragon refers during the Final Battle. According to the novel Dragon’s Dogma : The Beginning the fortress at the Tainted Mountain was established 100 before the time of Savan by a king of that region — if the Dragonforged was this king his Dragon would have been defeated by Savan many years ago, and so he should have died of old age long ago. It is possible that the Dragonforged exists in some sort of limbo, or perhaps even as undead — he himself describes himself as a ‘revanant’. Also further, circumstantial evidence for this theories is that Grigori describes the destruction of the Tainted Mountain city as » fool’s decision of a man too weak», words similar to the Dragonforged and the Fools own descriptions of themselves. There may yet be some connection between the Tainted Mountain and the Dragonforged.
Pawn Chatter
Main shaft
- «The world we knew is but a single leaf upon a vast tree…»
- «‘Tis fearsome deep… Fit to pierce the very heart of the world.»
- «‘Tis shaft is the axis along which all turns… ‘Tis the source.»
- «We stand at the threshold to truth, and all beyond it…»
- «We fall, and fall beyond…»
- «We stand at the trunk of all the branching worlds. The very root…»
Chambers
- «Are we truly trapped here? Left to wander for all time…»
- » ‘Tis the fate of all pawns who lose their masters.»
- «What… What is this place?
- «They wander still, bereaved.»
- «This place feels like no other I’ve known… Stay vigilant, Arisen.»