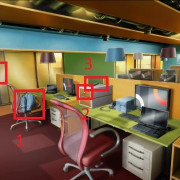
Rogue
Содержание:
- 7 Debonaire/Beguiler Puppet Master
- Generic headgear[]
- 1 Streetfighter/Shieldbearer Slayer
- Background[]
- 1 эксперимент и развлекайтесь
- List of headgear[]
- Talents[]
- List of grimoires[]
- Progression[]
- Ranks[]
- Description and usage[]
- 15 паладинов/чантеров
- Notable characters[]
- Suggestions[]
- 14 Воин/Монах Бледный Рыцарь
- Святой Мститель
- Points of interest[]
- Heavy armor[]
- 6 Выберите класс, соответствующий вашему стилю игры
- Progression[]
- Suggestions[]
7 Debonaire/Beguiler Puppet Master
Эта сборка идеальна для тех, кто устал от прямых повреждений. Это смесь подкласса Debonaire для Rogue и подкласса Beguiler для Cipher. Основная тактика, которую он использует, — очаровывать врагов, чтобы они сражались за вас или танковали противников лицом к лицу.
- Класс: Debonaire/Beguiler (Rogue/Cipher)
- Основные навыки: Roguish Charm, любое заклинание Deception
- Приоритетные характеристики: ловкость, интеллект, Мощь, Восприятие
- Оружие: Пистолет Громовержца, другое одноручное оружие.
- Головной убор: Thaos 39; Головной убор
- Нашейник: Одеяние Верховного Предвестника
- Доспехи: Одеяние Верховного Предвестника
- Кольца: все, что повышает характеристики Разбойника/Шифров.
Сапоги: все, что увеличивает скорость или скорость скрытых атак.
Waistpiece: Sash of Judgment
Handpiece: все, что усиливает скрытые атаки
Cape: Ajamuut Stalking Cloak
Generic headgear[]
| Icon | Name | Value | Location |
|---|---|---|---|
| Acorn Helm | 10 |
|
|
| Captain Fortanero’s Hat | 10 | ||
| Cloth Bandana | 10 | ||
| Crested Hat | 10 |
|
|
| Duelist’s Hat | 10 |
|
|
| Floppy Hat | 10 | ||
| Frog Helm | 10 |
|
|
| Full Helm | 10 |
|
|
| Great Helm | 10 |
|
|
| Helm | 10 | ||
| Hood | 10 |
|
|
| Hooded Turban | 10 |
|
|
| Iron Flail Archer Coif | 10 | ||
| Iron Flail Champion Helm | 10 | ||
| Iron Flail Infantry Helm | 10 | ||
| Iron Flail Warlock’s Helm | 10 | ||
| Mail Coif | 10 |
|
|
| Nasal Helm | 10 |
|
|
| Ondrite Paladin Helm | 10 | ||
| Ondrite Tidalfist Mask | 10 | ||
| Open Helm | 10 |
|
|
| Padded Cap | 10 |
|
|
| Plumed Helm | 10 |
|
|
| Ram Horn Helm | 10 |
|
|
| Skaen Cultist Hood | 10 | ||
| Skaen Initiate’s Hood | 10 | ||
| Small Horn Helm | 10 |
|
|
| Soft Hat | 10 | ||
| Thimble Hat | 10 | ||
| Tricorne Hat | 10 |
|
|
| Tundra Hood | 10 |
|
|
| Turban | 10 | ||
| Winged Helm | 10 |
|
|
| Woedica Hood | 10 |
1 Streetfighter/Shieldbearer Slayer
Эта сборка на самом деле дурацкая, несмотря на то, что она хорошо продумана. Он использует преимущество способности Rogue’s Riposte, где персонажу нужно накопить более 200 Deflection, чтобы большинство вражеских атак пропускались, и персонаж получал бесплатную атаку каждый раз, когда это происходит. С этой целью он лучше всего работает в одиночку, где вы можете кайтить врагов, и они так или иначе умрут.
- Класс: Streetfighter/Shieldbearer (Rogue/Paladin) мультикласс
- Основные навыки: Riposte, Escape, Sworn Enemy
- Приоритетные характеристики: Might, Perception , Решимость
- Оружие: копье Кахуа Хози и Щит Кадху Чешуи.
- Доспех: Бригантина кочевника
- Аксессуары: все, что дает дополнительное отражение
Background[]
Woedica, like the other gods, was created by Engwith out of the sacrifice of thousands of their souls at Sun in Shadow. Intended to be the strongest of the gods and to rule their pantheon, Woedica was simultaneously a patron of justice, oaths, and promises, and conversely, an entity willing to disregard the rules when it was necessary to accomplish her goals. She could do what she wanted with Eora at the apex of her power, which is why the other gods conspired to vanquish her, bringing the Queen down on even footing with the rest of them.
Yet even in exile, Woedica remained a potent god and the favored partner of Thaos, granting the Engwithan effective immortality by awakening his memories in each of his lives. He was devoted to her, favoring her specifically because of her wanton disregard for rules when they stood in the way of goals. The two were a perfect match.
1 эксперимент и развлекайтесь
Хотя вы можете оказаться в более неспешном приключении, если внимательно обдумаете персонажа, которого вы создаете, может быть не менее забавным повозиться с вариантами. Игра предлагает увлекательную задачу, но она достаточно сбалансирована, чтобы гарантировать, что у вас всегда будет шанс на успех, независимо от того, какого персонажа вы создадите.
Так что не переживайте слишком много над созданием персонажа. Идите против стереотипов. Сделайте глупого или необычного персонажа, если хотите. Или просто придерживайтесь стиля персонажа, который вам нравился в прошлом. В конце концов, все ролевые игры — это личное самовыражение и потеря персонажа и истории.
Pillars of Eternity — фантастическая изометрическая ролевая игра, которую стоит переигрывать снова и снова, пробуя новые классы и стили игры. Посмотрите, что лучше всего подходит для вас, а затем снова пройдите игру с совершенно другим творением.
List of headgear[]
| Icon | Name | Value | Enchantments | Location |
|---|---|---|---|---|
| Argwes Adra’s Helm (Unique) | 610 | |||
| Azalin’s Helmet | 210 | |||
| Company Captain’s Cap (Soulbound) | 1,640 |
|
||
| Crossed Patch | 310 |
|
||
| Dandy Hat of the Diseased Yak | 610 |
|
||
| Ethereal Helm | 210 | |||
| Executioner’s Hood | 1,010 |
|
||
| Footpad’s Hood | 600 |
|
|
|
| Garodh’s Chorus | 860 |
|
||
| He Carries Many Scars Helm | 210 |
|
||
| Helmet of Darksee | 410 | |||
| Hermit’s Hat | 710 |
|
|
|
| Iverra’s Diving Helmet | 242 |
|
|
|
| Kana’s Turban | 210 | |||
| Lavender Wreath | 510 |
|
||
| Liripipe of Thinking | 600 |
|
|
|
| Maegfolc Skull | 1,010 |
|
||
| Munacra Arret | 510 |
|
||
| Rugged Wilderness Hat | 600 |
|
|
|
| Sanguine Plate’s Helm | 110 | |||
| Stag Helm | 800 |
|
|
|
| Tempered Helm | 710 |
|
|
|
| The Dunryd Demon | 410 | |||
| The Pilgrim’s Lasting Vigil | 410 |
|
||
| The Witch’s Hat | 810 |
|
||
| Ultimate Hat of Alluring Perfection (Unique) | 1,210 |
|
||
| Waage’s Hat of Leadership | 210 | |||
| White Crest’s Helm | 610 |
Talents[]
Note: Pillars of Eternity only
- Deflecting Assault – Increases the rogue’s ability to concentrate, reducing the Deflection penalty when using Reckless Assault.
- Devastating Blow – Broadens the rogue’s knowledge of critical anatomy, increasing the damage done by Finishing Blow.
- Vicious Fighting – Improves the rogue’s skill with devious maneuvers, increasing the percentage of the rogue’s hits that are converted to Critical Hits when using Dirty Fighting.
- Shadowing Beyond – Allows the character to temporarily turn invisible. Enemies cannot detect invisible characters and attacks made from invisibility automatically count as a Sneak Attack. Attacking, casting a spell, using a special ability, or using an item will end the invisible state.
- Backstab – Dramatically increases melee damage done from Invisibility.
List of grimoires[]
| Icon | Name | Max level | Location | Spells |
|---|---|---|---|---|
| Aloth’s Grimoire | 1 | |||
| Apprentice’s Tome | 6 | |||
| Arcanist’s Treatise | 6 | |||
| Azrael’s Grimoire | 3 | |||
| Battle-worn Grimoire | 5 | |||
| Battle-worn Grimoire (Crägholdt) | 6 | |||
| Battlemage Grimoire | 5 | |||
| Blood-soaked Grimoire | 3 | |||
| Blood-spattered Grimoire | 5 | |||
| Death Guard’s Grimoire | 1 | |||
| Dwarven Tome | 7 | |||
| Elvara’s Grimoire | 4 | |||
| Embossed Grimoire | 3 |
|
||
| Faded Grimoire | 3 | |||
| Falanroed’s Grimoire | 6 | |||
| Gilt Grimoire | 5 | |||
| Glasvahl’s Grimoire | 6 | |||
| Grimoire (Backer Beta 1) | 2 | |||
| Grimoire (Backer Beta 2) | 3 | |||
| Grimoire (Pillars of Eternity) | 3 | |||
| Grimoire of a Dozens Wizard | 3 | |||
| Grimoire of the Elements | 6 |
|
||
| Grimoire of the Secret Order | 3 |
|
||
| Grimoire of the Tides | 7 | |||
| Harkeen’s Grimoire | 4 | |||
| Helig’s Grimoire | 3 | |||
| Iben’s Grimoire | 2 | |||
| Iron-bound Grimoire | 3 | |||
| Leaden Key Wizard Grimoire | 4 | |||
| Llengrath’s Grimoire | 8 | |||
| Looter’s Spellguide | 6 | |||
| Ludrana’s Grimoire | 2 | |||
| Maerwald’s Grimoire | 3 | |||
| Mercenary’s Grimoire | 2 | |||
| Mildewed Grimoire | 3 | |||
| Minoletta’s Grimoire | 6 | |||
| Ninagauth’s Black Pages | 7 | |||
| Novice’s Grimoire | 3 | |||
| Nyrid’s Grimoire | 3 | |||
| Osrya’s Grimoire | 3 | |||
| Pale Elf Wizard’s Grimoire (level 10) | 5 | |||
| Pale Elf Wizard’s Grimoire (level 5) | 4 | |||
| Pale Elf Wizard’s Grimoire (level 8) | 3 | |||
| Pelden’s Grimoire | 7 | |||
| Rinatto’s Grimoire | 4 | |||
| Sabel’s Grimoire | 6 | |||
| Sapper’s Tome | 5 | |||
| Singed Grimoire | 6 |
|
||
| Sorcerer’s Volume | 6 | |||
| Spellwright’s Tome | 2 | |||
| Surica’s Grimoire | 3 | |||
| The Ironclasped | 7 | |||
| The Leaves of Essence | 6 | |||
| Uariki’s Grimoire | 7 | |||
| Warlock’s Codex | 5 | |||
| Waterlogged Grimoire | 3 | |||
| Weathered Grimoire | 5 |
|
||
| Willbreaker | 6 | |||
| Winters’ Woes | 6 |
Progression[]
In Pillars of Eternity
- At character creation, ciphers automatically learn the passive ability Soul Whip.
- Ciphers select two powers at every odd level (1, 3, 5, etc.), and one power at every even level (2, 4, 6, etc.).
- At every odd level (1, 3, 5, etc.), the next tier of abilities are unlocked.
- As with other classes, ciphers learn one talent at every even level (2, 4, 6, etc.).
- Max and starting focus scales with the cipher’s level (see below).
In Pillars of Eternity II: Deadfire
- At character creation, ciphers select one 1st level ability (active only), and automatically learns the passive ability Soul Whip. This does not change for multiclass characters.
- As with other classes, ciphers pick 2 abilities at every level where a new power level is unlocked excluding the first (3, 5, 7, 9, 11, 13, 16, 19), and one ability at all other levels (1, 2, 4, 6, 8, 10, 12, 14, 15, 17, 18, 20). Ability points may be spent on active or passive abilities, and on any currently-unlocked power levels.
- Ciphers use Focus (an accrued resource) to cast abilities. The maximum and starting Focus scales with the cipher’s level (see below)
- As with other classes, new ability power levels are learned every second level from level 1 (1, 3, 5, 7, 9, 11, 13), then every third level from level 13 (16, 19). Multiclass characters may only learn up to (and including) power level 7 abilities, and unlock a new power level every third level from level 1 (1, 4, 7, 10, 13, 16, 19).
| Ability points at each level | ||||
|---|---|---|---|---|
| Level | Power level learned | Points available | ||
| Single | Multi | Single | Multi | |
| 1 | 1 (I) | 1 (I) | 1 | 1+1 |
| 2 | 1 | 1 | ||
| 3 | 2 (II) | 2 | 1 | |
| 4 | 2 (II) | 1 | 1+1 | |
| 5 | 3 (III) | 2 | 1 | |
| 6 | 1 | 1 | ||
| 7 | 4 (IV) | 3 (III) | 2 | 1+1 |
| 8 | 1 | 1 | ||
| 9 | 5 (V) | 2 | 1 | |
| 10 | 4 (IV) | 1 | 1+1 | |
| 11 | 6 (VI) | 2 | 1 | |
| 12 | 1 | 1 | ||
| 13 | 7 (VII) | 5 (V) | 2 | 1+1 |
| 14 | 1 | 1 | ||
| 15 | 1 | 1 | ||
| 16 | 8 (VIII) | 6 (VI) | 2 | 1+1 |
| 17 | 1 | 1 | ||
| 18 | 1 | 1 | ||
| 19 | 9 (IX) | 7 (VII) | 2 | 1+1 |
| 20 | 1 | 1 |
Ranks[]
At first level, a character only has their initial class and background bonuses to skills. Each class confers bonuses in two or three skills and each background in one or two skills.
Upon achieving a new level, a character gains six skill points. Advancing a skill to the next rank costs one point, plus one point per time the skill has already been advanced. Note that class, background, and other bonuses are «free» and do not increase the cost of advancing skills.
Class bonuses
The following table lists bonuses received from classes:
- Legend
- = 1 rank, = 2 ranks
| Class | Stealth | Athletics | Lore | Mechanics | Survival |
|---|---|---|---|---|---|
| Barbarian | |||||
| Chanter | |||||
| Cipher | |||||
| Druid | |||||
| Fighter | |||||
| Monk | |||||
| Paladin | |||||
| Priest | |||||
| Ranger | |||||
| Rogue | |||||
| Wizard |
Background bonuses
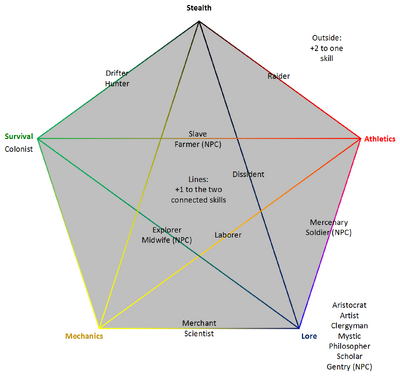
This section lists all bonuses from backgrounds:
- Legend
- = 1 rank, = 2 ranks
| Background | Stealth | Athletics | Lore | Mechanics | Survival |
|---|---|---|---|---|---|
| Aristocrat | |||||
| Artist | |||||
| Clergyman | |||||
| Colonist | |||||
| Dissident | |||||
| Drifter | |||||
| Explorer | |||||
| Hunter | |||||
| Laborer | |||||
| Mercenary | |||||
| Merchant | |||||
| Mystic | |||||
| Philosopher | |||||
| Raider | |||||
| Scholar | |||||
| Scientist | |||||
| Slave | |||||
| Farmer (NPC only) | |||||
| Gentry (NPC only) | |||||
| Midwife (NPC only) | |||||
| Soldier (NPC only) | |||||
| Trapper (NPC only) |
Buffs
Rites are a special, non-craftable type of scrolls that temporarily boost specific skills.
Certain wearable and consumable items can additionally provide temporarily bonuses to skills. See the associated skill pages for more information.
Description and usage[]
In Pillars of Eternity
Survival allows characters to choose from a variety of long-term bonuses each time they camp. The first six levels grant the following bonuses, in order (Rank I / Rank II / Rank III).
- Damage Reduction (+1/+2/+3)
- Received Healing Multiplier (+20%/+40%/+60%)
- Bonus Movement (+1/+2/+3)
- Accuracy Bonus vs. Creature Type (+10/+15/+18)
- Increased Consumable Duration (+20%/+40%/+60%)
- Bonus Damage vs. Flanked Enemies (+10%/+20%/+30%)
After the sixth level, the previously-earned bonuses are replaced by more powerful bonuses in the same order they were received (capping at level III).
Survival can also be used in conversations and scripted interactions that involve wilderness challenges or specialized information about nature.
| Bonuses given | Survival level | |||||||||||||||||||||
|---|---|---|---|---|---|---|---|---|---|---|---|---|---|---|---|---|---|---|---|---|---|---|
| 1 | 2 | 3 | 4 | 5 | 6 | 7 | 8 | 9 | 10 | 11 | 12 | 13 | 14 | 15 | 16 | 17 | 18 | 19 | 20 | 21 | 22 | 23 |
| Damage reduction | Rank I: +1 Damage Reduction | Rank II: +2 Damage Reduction | Rank III: +3 Damage Reduction | |||||||||||||||||||
| Healing multiplier | Rank I: +20% Healing received | Rank II: +40% Healing received | Rank III: +60% Healing received | |||||||||||||||||||
| Bonus movement | Rank I: +1 Move Speed | Rank II: +2 Move Speed | Rank III: +3 Move Speed | |||||||||||||||||||
| Accuracy bonus vs type | Rank I: +10 Accuracy against type | Rank II: +15 Accuracy against type | Rank III: +18 Accuracy against type | |||||||||||||||||||
| Consumable duration | Rank I: +20% Consumable Duration | Rank II: +40% Consumable Duration | Rank III: +60% Consumable Duration | |||||||||||||||||||
| Damage vs. flanked | Rank I: +10% Damage to Flanked targets | Rank II: +20% Damage to Flanked targets | Rank III: +30% Damage to Flanked targets |
In Pillars of Eternity II: Deadfire
|
Survival can be used in conversations and scripted interactions that involve wilderness challenges or specialized information about nature. |
In Pillars of Eternity II: Deadfire, the bonuses given to characters at rest are based upon food and drink, instead of Survival. As with other passive skills, Survival is only used during conversations and scripted interactions, and otherwise has no effect on gameplay or combat mechanics.
15 паладинов/чантеров
Вы хотите, чтобы персонаж просто стоял там, в то время как все враги вокруг них умирают в огненном пламени праведности? Паладин/Чантер вас прикрыли. Он вращается вокруг злоупотребления заклинанием Brand Enemy и объединения мультиклассов Goldpact Knight и Troubadour 39; суммирование дебаффов на пробивание огня.
- Класс: Рыцарь Золотого Договора (Паладин)/Трубадур (Чантер)
- Приоритетные характеристики: Мощь, Восприятие, Интеллект, Решимость.
- Оружие: Магран и # 39; s Favor, Nerian’s Ward
- Головной убор: любой
- Нашейник: Strand of Favor
- Броня: патинированная пластина
- Кольца: Приз Куару, Кольцо Сосредоточенного Пламени
- Сапоги: Сапоги Камня
- Пояс: Любой
- Наконечник: Woedica 39; s Удушающая хватка
- Cape: Greater Cloak of Deflection
Также не забудьте взять эти заклинания, вы можете найти их как в дереве Рыцаря Золотого Договора, так и в дереве Трубадура:
- Дракон побежден, дракон вопит.
- Щит трескается.
- Их защитник в одиночку вырвался против Орды.
- Враг-заклятый враг
- Отпрыск пламени
- Вдохновленная защита и Стоическая сталь
- Аура Рвения
- Добродетельный Триумф
- Стиль оружия и щита
- Глубокая вера
- Рефлексы Змеи
Notable characters[]
- Pillars of Eternity
Aloth Corfiser
Caedman Azo
Elfya
Glasvahl
Harkeen Willthorm
Helig of Thein
High Arcanist Ysly
Laenric
Ludrana
Nans
Nedyn
Nyrid
Sabel
- The White March — Part I
Haeferic
Pelden
Uariki
- Pillars of Eternity II: Deadfire
Adurix
Aimuro
Akema
Aloth Corfiser
Arkemyr
Bekarna
Bipara
Blidh
Caedman Azo
Eccea
Ernezzo
Fassina
Flaune Elette
Gian
Haema
Handsome Eliam
Iverra
Ivorr the Bright
Katrenn
Kismet
Loisa
Lueva Alvari
Menzzago
Merrick
Myrin
Myrlesfen the Truly Insane
Nera Bardatto
Nia
Olara
Oswald
Persanale Cianca
Sigilmaster Auranic
Synbel
Taerna
Tangara
Tuaha
Vanizzi
Zulka
Suggestions[]
Monks consists of the most well rounded melee specialists available. You can shape them to become incredibly tanky, intense damage dealers, or some thing in between. They also offer the best ability choices available for slipping behind into the enemy’s back line in a fight to lock down a tactically important enemy caster. They sort of could be considered the «commando» class, when you need some thing taken care of while the battle rages. You can literally mix any weapon, armor, and shield combination with this class and perform well as long as you respect what goes well with each other. Monks will default to using unarmed combat for using a melee ability against a close opponent if you have a single ranged weapon equipped, so you will not generally suffer an Accuracy penalty in that regard. Normal melee attacks will still incur an Accuracy penalty and slow speed, while you have the ranged weapon equipped. If you want to choose a character that is easy to play on the front line, then monks makes the best choice before fighters. However if you want a tankier character for your group, then fighter makes a somewhat better choice.
If you want to multiclass, then Monk + Fighter (aka Brawler) is hard to beat. You can get all the goodness from Fighter Stances while knocking some one around silly with Monk abilities. Monk + Rogue (Trickster) can prove especially nasty at dealing damage to an opponent while keeping them tactically locked down. While monks provide superior combat abilities, the class mostly win through attrition. This means it can take a long time for them to gain victory, but they almost always come out a bit better in an equal fight. If you spell buff them properly, then they can even wander into a crowd, cause some havoc, and then leave with little trouble, buying you some time for the rest of your team. In any situation, a monk survives by disrupting; not by tanking. If you leave them in a group of melee enemies, then they might not fare so well. How ever with some proper resistances and bit of healing, they can handle spell casters with little trouble as the rest of your group works on the enemy’s front line. A strange mix is Monk + Wizard (aka Sake) — with the defensive and weapon type Spells, they could wreck some serious damage. Spell Reflection alone could make it worth it.
14 Воин/Монах Бледный Рыцарь
Заблудший грешник — тот, кто отвечает за эту сборку, и он/она называет его Бледным рыцарем. Это классический стиль игры — большое двуручное оружие, в котором персонаж будет в центре внимания и будет сиять в авангарде любой схватки. Лучше всего использовать для этого двуручный меч, так как это создает дополнительный фактор устрашения и эстетичный вид. Рассекающая стойка обязательна здесь вместе с Swift Flurry и Avenging Storm.
- Класс: Преданный (Боец)/Hellwalker (Монах)
- Приоритетные характеристики: Восприятие, Ловкость, Телосложение
- Оружие: Шепот бесконечных путей
- Головной убор: Какофония Небес
- Нашейник: Амулет костей
- Доспех: Наследие Каситы Самелии
- Кольца: Сенсорное кольцо Хамелона, Кольцо с печаткой Энтонии
- Сапоги: Каменные сапоги
- Пояс: Собственная сила Создателя
- Наконечник: Болтоловы
- Накидка: Плащ Великого Отражения
Святой Мститель
 Святой Мститель
Данный билд является смесью Паладина и Авантюриста. Развить его проще простого, причем гибрид почти не страдает от ошибок и едва слабеет, если вы прокачиваете его неверно.
Важно, что способность Паладина «Вера и Убеждение», а затем последующее ее улучшение позволит вам наносить колоссальные повреждения врагу, но при этом иметь высокую выживаемость. Это умение будет увеличивать все виды защиты пассивным образом в ходе прокачки самого героя
 Вера и Убеждение
Что касается Авантюриста, то его способность «Заклятый Враг» значительно увеличивает атаку по выделенной цели. «Маяк Вдохновения» – не менее важный навык, ослепляющий противников и ослабляющий их защиту почти в два раза.
«Ловкое Уклонение» – еще один важный для защиты навык, что превращает все незначительные попадания в промахи. Благодаря ему, персонаж сможет блокировать даже волшебные заклинания, включая «Дыхание дракона».
Что касается отступления, то и здесь «Святой Мститель» может похвастаться соответствующим умением – «Бегство». У класса нет особенных способов для выхода из боя, поэтому с помощью данного навыка он сможет быстро отойти в тыл и восстановить силы.
Points of interest[]
- The White March — Part I
- You enter the village as it is attacked by a war party of crag ogres. To properly meet the denizens, you need to find Darzir, the leader of the ogres, and turn him into kibble.
- After the attack, the hut to the west is on fire. You can interact with it for a chance to save two villagers. See Durgan’s Battery for details.
- To the southwest, just next to the fishery, a villager runs away from a basket full of fish. Interact with it to meet Zahua, one of two companions available in the snowy wastes.
- To the southeast is the Temple of Ondra. Approaching it will trigger a short cutscene with Ista and Okrun.
- Yduran and his merchant cart is near the entrance to the village. Just a short way north is Thyrsc’s House.
- The White March — Part II
- The village inherits much of its layout from the previous expansion, as expected. The notable changes are that the Temple of Ondra is replaced by the Temple of Abydon, the ruined houses are replaced with yurts, with the northern of the two becoming Hamond’s Emporium, and that the Stalwart Mines in the northeastern corner are reopened.
- As you enter the village, you are automatically caught in a cutscene, with Deryan calling upon the people of Stalwart to confront the Iron Flail, a Readceran army massing outside the town. They are, obviously skeptical.
Heavy armor[]
| Icon | Name | DR | Value | Enchantments |
|---|---|---|---|---|
| Äru-Brekr (Unique) | 10 Base 13 8 | 340 |
|
|
| Coat of Ill Payment (Unique) | 14 Base 18 11 | 940 |
|
|
| Heldrik’s Coat (Unique) | 14 Base 18 11 17 | 640 |
|
|
| The Colored Coat (Unique) | 14 Base 18 11 | 1,040 |
|
| Icon | Name | DR | Value | Enchantments |
|---|---|---|---|---|
| Argwes Adra (Unique) | 14 Base 18 18 7 | 600 |
|
|
| Devil of Caroc’s Body (Unique) | 8 Base 10 10 4 | 200 | ||
| He Carries Many Scars (Unique) | 14 Base 18 18 7 | 600 |
|
|
| Sanguine Plate (Unique) | 12 Base 15 15 6 | 700 |
|
|
| White Crest Armor (Unique) | 16 Base 20 20 8 | 900 |
|
6 Выберите класс, соответствующий вашему стилю игры
В играх Pillars of Eternity есть широкий выбор классов и подклассов. Вы можете быть грозным варваром или могущественным волшебником. В первой игре доступно 11 классов:
- Варвар
- Чантер
- Шифр
- Друид
- Боец
- Монах
- Паладин
- Жрец
- Рейнджер
- Разбойник
- Мастер
Важно решить, какой тип игрового процесса вы ищете в данном конкретном прохождении. Если вы хотите быть в большей степени вспомогательной ролью для своей группы, возможно, выберите Чантера, Жреца или Друида
Если вам не терпится попасть под удар в пылу битвы, выбирайте варвара, бойца, монаха или паладина. Хотите вызвать хаос на расстоянии? Возможно, поеду с Рейнджером. Хотите сосредоточиться на управлении толпой с помощью магии, выберите Шифр или Волшебника. Если вам нужна хитрая тактика, Rogue — ваш лучший выбор.
Не торопитесь на этом этапе создания персонажа. Нет спешки. Прочтите различные льготы, перечисленные для каждой роли, подумайте об их классовых способностях и сделайте то, от чего, по вашему мнению, вы получите больше всего удовольствия, в зависимости от того, как вы обычно любите играть.
Progression[]
In Pillars of Eternity
- At character creation, priests must select one deity, and automatically learn the ability Holy Radiance (the effects of which scale with their deity’s favoured disposition — or with their level in the case of NPCs).
- A priest’s selected deity grants them one unique talent that can be learned at any time (see below).
- As spellcasters, priests learn all spells at each new tier, but are limited to the amount of casts that can be made per rest at each tier (see the table below).
- At every odd level (1, 3, 5, etc.), the next tier of spells are unlocked.
- Spell Mastery allows the spellcaster to pick a single spell to switch to «per encounter» restoration. This occurs at level 9, 11, 13, and 15, for 1st, 2nd, 3rd and 4th level (or lower) and spells respectively.
- As with other classes, priests learn one talent at every even level (2, 4, 6, etc.).
| Characterlevel | Ability levellearned | Maximum casts by ability level / tier | Spellmastery | |||||||
|---|---|---|---|---|---|---|---|---|---|---|
| 1st | 2nd | 3rd | 4th | 5th | 6th | 7th | 8th | |||
| 1 | 1st | 2 | ||||||||
| 2 | 3 | |||||||||
| 3 | 2nd | 4 | 2 | |||||||
| 4 | 4 | 3 | ||||||||
| 5 | 3rd | 4 | 4 | 2 | ||||||
| 6 | 4 | 4 | 3 | |||||||
| 7 | 4th | 4 | 4 | 4 | 2 | |||||
| 8 | 4 | 4 | 4 | 3 | ||||||
| 9 | 5th | 4 | 4 | 4 | 4 | 2 | 1st | |||
| 10 | 4 | 4 | 4 | 4 | 3 | |||||
| 11 | 6th | 4 | 4 | 4 | 4 | 4 | 2 | 2nd | ||
| 12 | 4 | 4 | 4 | 4 | 4 | 3 | ||||
| 13 | 7th | 4 | 4 | 4 | 4 | 4 | 4 | 2 | 3rd | |
| 14 | 4 | 4 | 4 | 4 | 4 | 4 | 3 | |||
| 15 | 8th | 4 | 4 | 4 | 4 | 4 | 4 | 4 | 2 | 4th |
| 16 | 4 | 4 | 4 | 4 | 4 | 4 | 4 | 3 |
In Pillars of Eternity II: Deadfire
- At character creation, priests must pick a deity, select one 1st level spell (active only), and automatically learn the ability Holy Radiance. This does not change for multiclass characters. A priest’s subclass automatically grants them one spell at every power level.
- As with other classes, priests pick 2 spells/abilities at every level where a new power level is unlocked excluding the first (3, 5, 7, 9, 11, 13, 16, 19), and one spell/ability at all other levels (1, 2, 4, 6, 8, 10, 12, 14, 15, 17, 18, 20). Ability points may be spent on active or passive abilities, and on any currently-unlocked power levels.
- As spellcasters, priests are limited to the amount of spell casts that can be made per encounter at each tier, though this scales with their level (see the table below).
- As with other classes, new ability power levels are learned every second level from level 1 (1, 3, 5, 7, 9, 11, 13), then every third level from level 13 (16, 19).
| Ability points at each level | ||||
|---|---|---|---|---|
| Level | Power level learned | Points available | ||
| Single | Multi | Single | Multi | |
| 1 | 1 (I) | 1 (I) | 1 | 1+1 |
| 2 | 1 | 1 | ||
| 3 | 2 (II) | 2 | 1 | |
| 4 | 2 (II) | 1 | 1+1 | |
| 5 | 3 (III) | 2 | 1 | |
| 6 | 1 | 1 | ||
| 7 | 4 (IV) | 3 (III) | 2 | 1+1 |
| 8 | 1 | 1 | ||
| 9 | 5 (V) | 2 | 1 | |
| 10 | 4 (IV) | 1 | 1+1 | |
| 11 | 6 (VI) | 2 | 1 | |
| 12 | 1 | 1 | ||
| 13 | 7 (VII) | 5 (V) | 2 | 1+1 |
| 14 | 1 | 1 | ||
| 15 | 1 | 1 | ||
| 16 | 8 (VIII) | 6 (VI) | 2 | 1+1 |
| 17 | 1 | 1 | ||
| 18 | 1 | 1 | ||
| 19 | 9 (IX) | 7 (VII) | 2 | 1+1 |
| 20 | 1 | 1 |
| Max spell casts at this power level | |||||||||||
|---|---|---|---|---|---|---|---|---|---|---|---|
| Powerlevel | Character level | Ability power level | |||||||||
| Single | Multi | 1 | 2 | 3 | 4 | 5 | 6 | 7 | 8 | 9 | |
| 1 (I) | 1 | 1 | 2 | ||||||||
| 2 (II) | 3 | 4 | 2 | 1 | |||||||
| 3 (III) | 5 | 7 | 2 | 2 | 1 | ||||||
| 4 (IV) | 7 | 10 | 2 | 2 | 2 | 1 | |||||
| 5 (V) | 9 | 13 | 2 | 2 | 2 | 2 | 1 | ||||
| 6 (VI) | 11 | 16 | 2 | 2 | 2 | 2 | 2 | 1 | |||
| 7 (VII) | 13 | 19 | 2 | 2 | 2 | 2 | 2 | 2 | 1 | ||
| 8 (VIII) | 16 | 22 | 2 | 2 | 2 | 2 | 2 | 2 | 2 | 1 | |
| 9 (IX) | 19 | 25 | 2 | 2 | 2 | 2 | 2 | 2 | 2 | 2 | 1 |
Suggestions[]
Priest presents the best choice for sole healing. Depending on how well your group’s front line holds things together, you may find your character either healing some or a lot. Priest very much defines what a back line healer consists of, but their spells easily reach any where. If someone goes below half health, a priest can quickly cast a Withdraw spell to temporarily take them out of battle for some seriously huge healing. The default AI tends to be somewhat intelligent about this, especially with Xoti. As a side note, Xoti performs best as a Contemplative (Priest + Monk multiclass). Otherwise, you may find the character passing out a lot as she tries to «reap» those souls from your enemies at the front line. This will tend to draw much aggression her direction that leads to her spells never going off, and no healing means you may quickly lose the battle.
Priest offers some of the best aggressively defensive spells available. This may involve laying down spell traps in the form of seals that damage your enemies as they walk through them. However, the class’ direct damage spells lack much of the oomph seen in several other classes. A properly built Cipher or Wizard will out-perform well in that area given a long battle. If you want to engage often in melee with your opponents as a single class Priest, then you should learn to focus on Blessing and Dire Blessing. You can use the Withdraw spell for emergencies.
As mentioned earlier with Xoti, Monk makes a fantastic Multi Class option if you prefer mixing it in with melee on the front line in battle.